In this chapter, we will explore the object-oriented design of an Elevator System. Compared to some of the other popular interview problems, this one places a stronger emphasis on modeling behavior, rather than on modeling data. Our approach will focus on designing key components such as how to represent real-world elevators, the elevator's state, incoming hallway call requests, and the algorithm that determines the elevator's movement.
New here? In plain terms, this is what we’re building and why — with an everyday analogy to anchor your intuition before the deep dive below.
An elevator controller is a dispatcher for requests. Rather than serve calls in random order, a smart elevator sweeps in one direction picking up everyone going that way, then reverses — like a bus route. Modelling cars, requests, and a scheduler as objects captures who decides what and when.
Here is an example of a typical prompt an interviewer might give:
“Imagine you are in an office building with a bunch of identical elevator cars, and they all go to the same set of floors. You press the “up” or “down” button on your floor, and an elevator arrives promptly. Inside, you select your desired floor from a panel of buttons, and the elevator takes you there. Behind the scenes, the system efficiently manages elevator assignments and ignores requests in the wrong direction. Now, let’s design an elevator system that handles all of this.”
Here is an example of how a conversation between a candidate and an interviewer might unfold:
Candidate: Are we designing an elevator system for an office building, or do we need to consider other types of elevators as well, such as industrial elevators for factories or freight elevators for heavy goods?
Interviewer: Only for office buildings.
Candidate: Do all elevator cars serve the same set of floors?
Interviewer: Yes, all elevator cars can serve every floor.
Candidate: When a user presses the "up" or "down" button on a particular floor, what strategy should the system use to determine which elevator to dispatch?
Interviewer: The specific strategy is up to you. Ideally, it could be configurable. We should be able to easily swap strategies to see which one fits best for the building’s traffic. It could be a first-come, first-served strategy for fairness or other strategies.

Tip: The top floor should only have a “down” button, and the bottom floor should only have an “up” button. While it’s great to recognize this detail during design, it’s not critical if it isn’t the primary focus.
Based on the conversation and how elevator systems work in the real world, here are the key functional requirements we’ve identified.
Below are the non-functional requirements:
Some of the requirements above are based on common sense in elevator systems. It’s a good idea to list them briefly during an interview to ensure everyone is on the same page. This way, the interviewer can step in if they want to adjust or clarify any assumptions. It helps save time and keeps the conversation aligned with the interviewer’s expectations.
Elevator systems typically include two types of buttons, each serving a distinct purpose for controlling elevator operations:
Note: From this point onward, we will use the terms "hallway buttons" and "floor buttons" in our discussions.
A use case diagram shows how actors (users or systems) interact with a system to achieve specific goals. In the elevator system, this will help us clarify key actions, such as requesting an elevator, selecting a floor, and dispatching an elevator.
Below is the use case diagram of the elevator system.
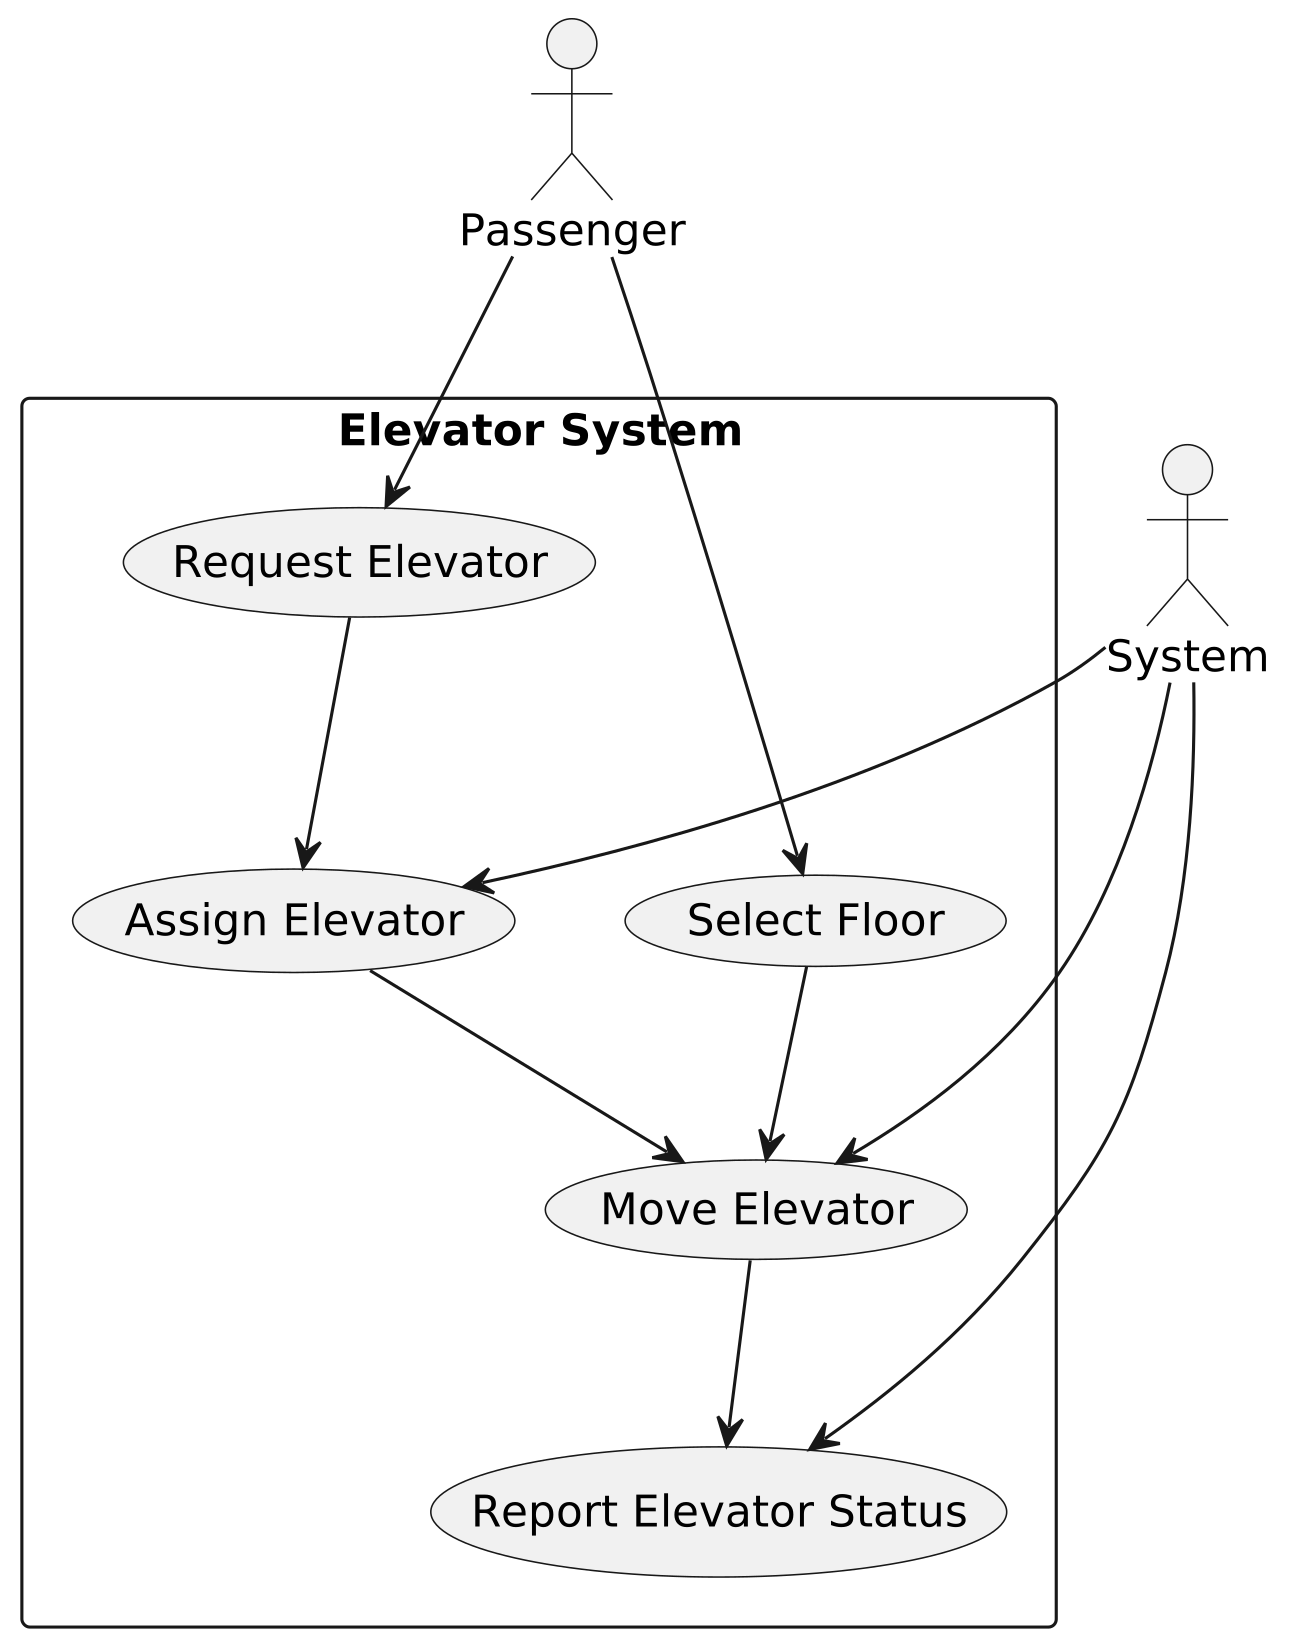
The use cases for the Passenger actor are as follows:
The use cases for the System actor are as follows. Note that actors are not necessarily humans:
Before diving into the design, it’s important to enumerate the core objects.
To choose the right strategy for modeling our system, let's first consider whether the elevator problem is more centered around logic or data. The use cases for the elevator are pretty straightforward. We can easily picture a user calling an elevator, getting inside, and selecting a floor. However, when it comes to the data model, it’s less clear which entities require detailed modeling. For example, do we need to model the doors, individual buttons, or passengers?
Since the use cases are clearer than the underlying data model, we’ll start with the system’s behaviors and user interactions (captured through use cases) and then use them to guide the definition of classes and methods. With the core use cases already defined, we can now directly translate their responsibilities into the key classes that implement the system’s functionality.
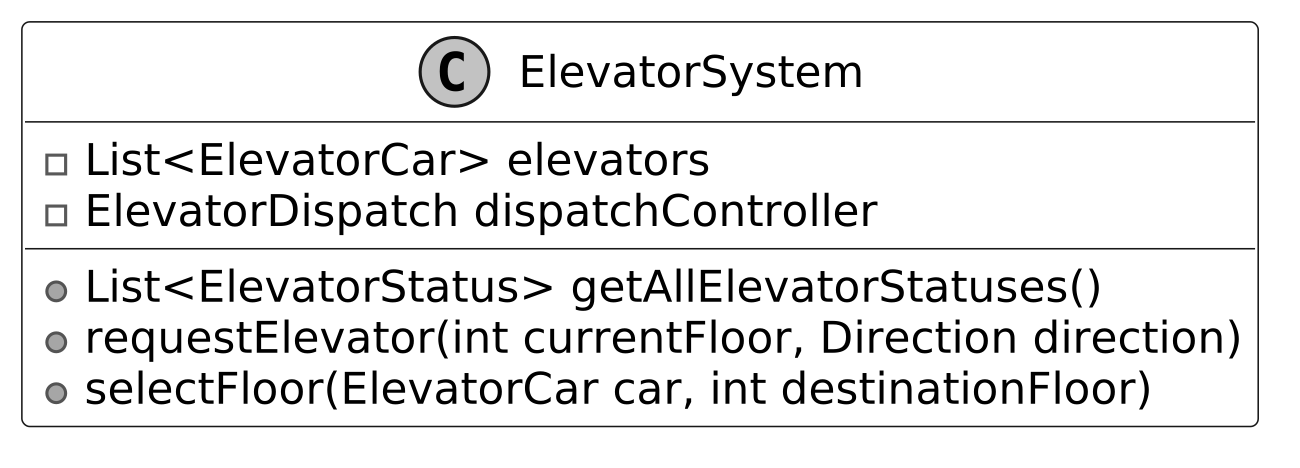
The ElevatorSystem class serves as the central controller, providing an API for controlling all the elevator cars, tracking their status, and handling dispatching requests efficiently.
By looking at the use case diagram, we can identify three core responsibilities of the system, each tied to specific APIs.
To prevent the ElevatorSystem class from becoming overly complex and difficult to maintain, we delegate the task of assigning elevators to a separate ElevatorDispatch controller using composition.
Below is the UML diagram for the ElevatorSystem class.
Tip: In object-oriented design, naming things correctly is very important, even more so than in typical coding interviews. Clear names help avoid confusion. For example, it’s important to clearly tell the difference between a single elevator car and the whole elevator system. In this design, we’ll use simple suffixes like System, Dispatch, or Strategy to make things clear. Good names save time explaining and help you move faster in an interview.
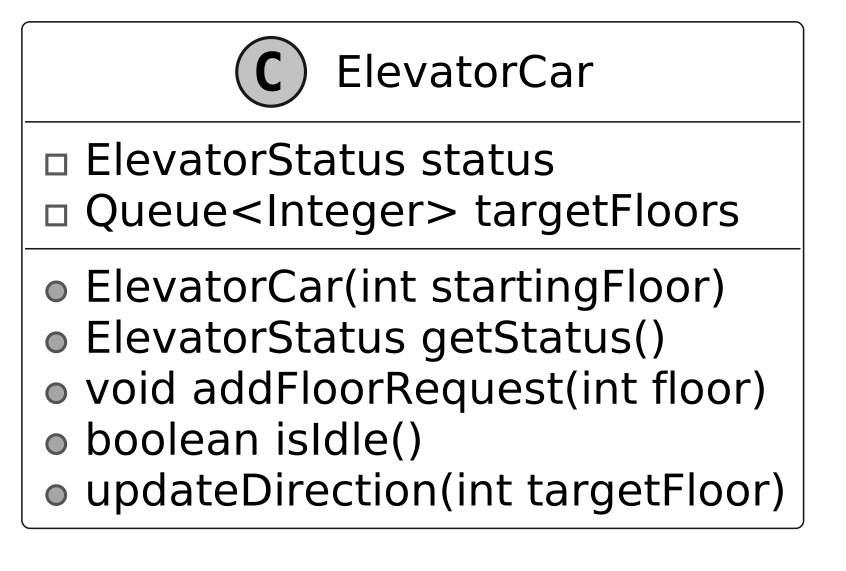
The ElevatorCar class models the behaviors of an elevator car within the system. It maintains a queue of target floors to track requested stops and delegates state management to the ElevatorStatus class for modularity.
This delegation allows the ElevatorStatus class to encapsulate dynamic attributes, such as the elevator’s current floor and movement direction. The Direction enum further simplifies this by defining movement as UP, DOWN, or IDLE.
The UML diagram below illustrates this structure.

Design choice: We chose to separate the elevator car’s state (e.g., current floor, direction) into a dedicated ElevatorStatus class to promote reusability and clarity, allowing status-related logic to be managed independently. This separation also supports future extensions, such as adding more state attributes (e.g., door status) without modifying the ElevatorCar itself.
The ElevatorStatus class provides a snapshot of the current state of an elevator car, encapsulating its currentFloor and currentDirection in a single object. It is a simple class but crucial for tracking the elevator’s real-time state.
The status is updated dynamically as the elevator moves between floors, providing real-time information to the system.
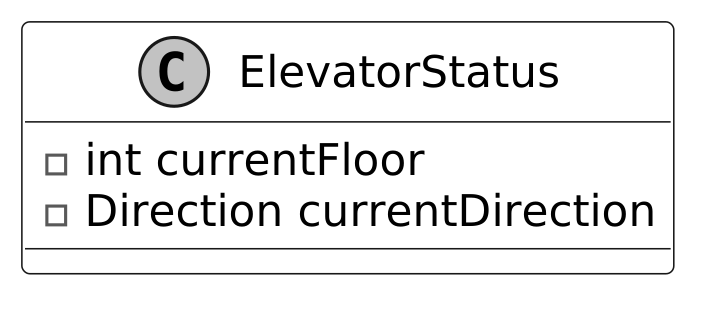
Alternative approach: We could have used a generic data structure, such as a key-value collection, to store elevator state attributes like floor and direction. However, a dedicated ElevatorStatus class was chosen for its type safety and its extensibility, allowing new attributes (e.g., maintenance status) to be added without affecting other system components.
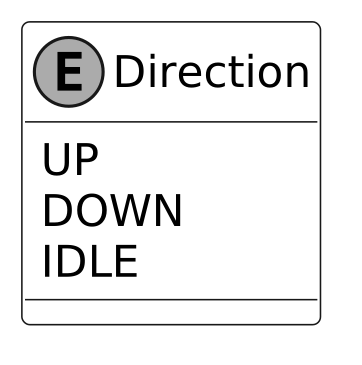
The Direction enum provides a type-safe way to represent an elevator’s movement direction. It includes three possible values.
By using an enum instead of arbitrary values, the system minimizes ambiguity and ensures consistent, predictable behavior across all elevator cars. It plays a key role in optimizing elevator operation, helping prevent unnecessary direction changes, and minimizing wait times for users. For example:
The UML diagram for the Direction enum is shown below:
The ElevatorDispatch class plays a critical role in managing user requests from hallway buttons and floor buttons, determining and selecting the appropriate elevator car to handle each request efficiently. To clarify what “dispatch” means in this context, it refers to assigning an elevator to handle a hallway call request and directing it to make a stop. From the perspective of an elevator car, both picking up and dropping off users are treated as stops along its path.
The dispatch logic relies on the Strategy Pattern, which enables the system to dynamically select and swap between different algorithms for optimizing elevator allocation.
Note: To learn more about the Strategy Pattern and its common use cases, refer to the Parking Lot chapter of the book.
The general dispatching process follows three main steps:
Below is the representation of this class.
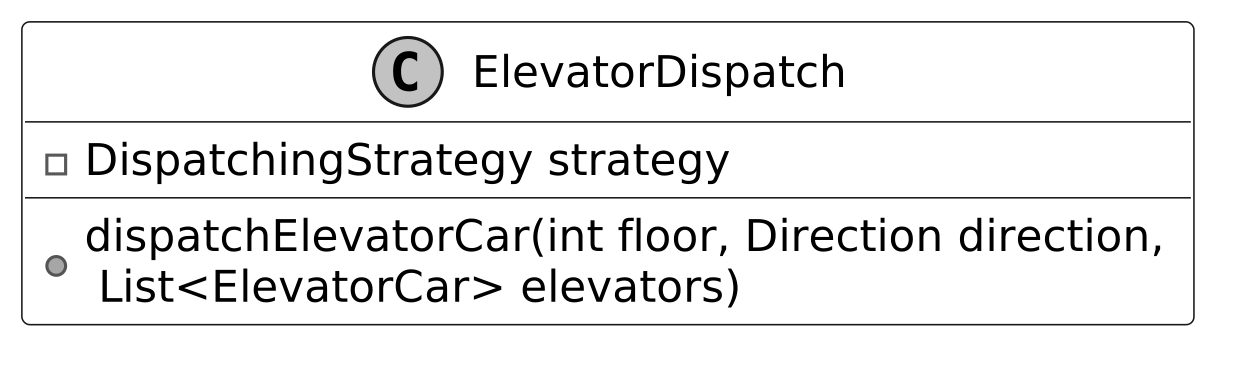
: Processes the request from a hallway button by evaluating the current state of all elevators and assigning the most suitable one to respond.DispatchingStrategy interface:
The DispatchingStrategy defines the specific rules for selecting an elevator car when a hallway button is pressed.
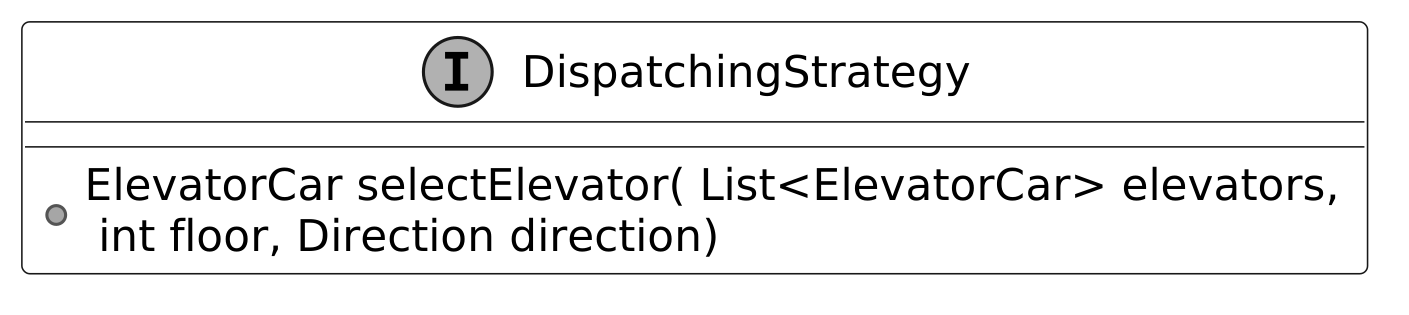
By abstracting the selection logic, the system is adaptable to various strategies, allowing flexibility in optimizing the dispatch process.
First Come, First Serve (FCFS): The system assigns the request to the next available elevator in the system’s dispatch queue, regardless of its direction or proximity to the request. This strategy is simple but might not always be the most efficient in a busy system.
Shortest Seek Time First (SSTF): The system assigns the request to the elevator that can reach the requested floor the fastest by evaluating two key factors. It first checks whether the elevator is either idle or moving in the direction of the request. Among these elevators, it then selects the elevator closest to the requested floor, minimizing the user’s wait time.
Dynamic Strategies: The dispatch strategy of the system can be dynamically configurable based on traffic patterns. For example, a “high throughput” strategy may optimize for speed during busy periods, while a “first-come, first-served” strategy can be used during quieter hours.
Below is the complete class diagram of the elevator system:
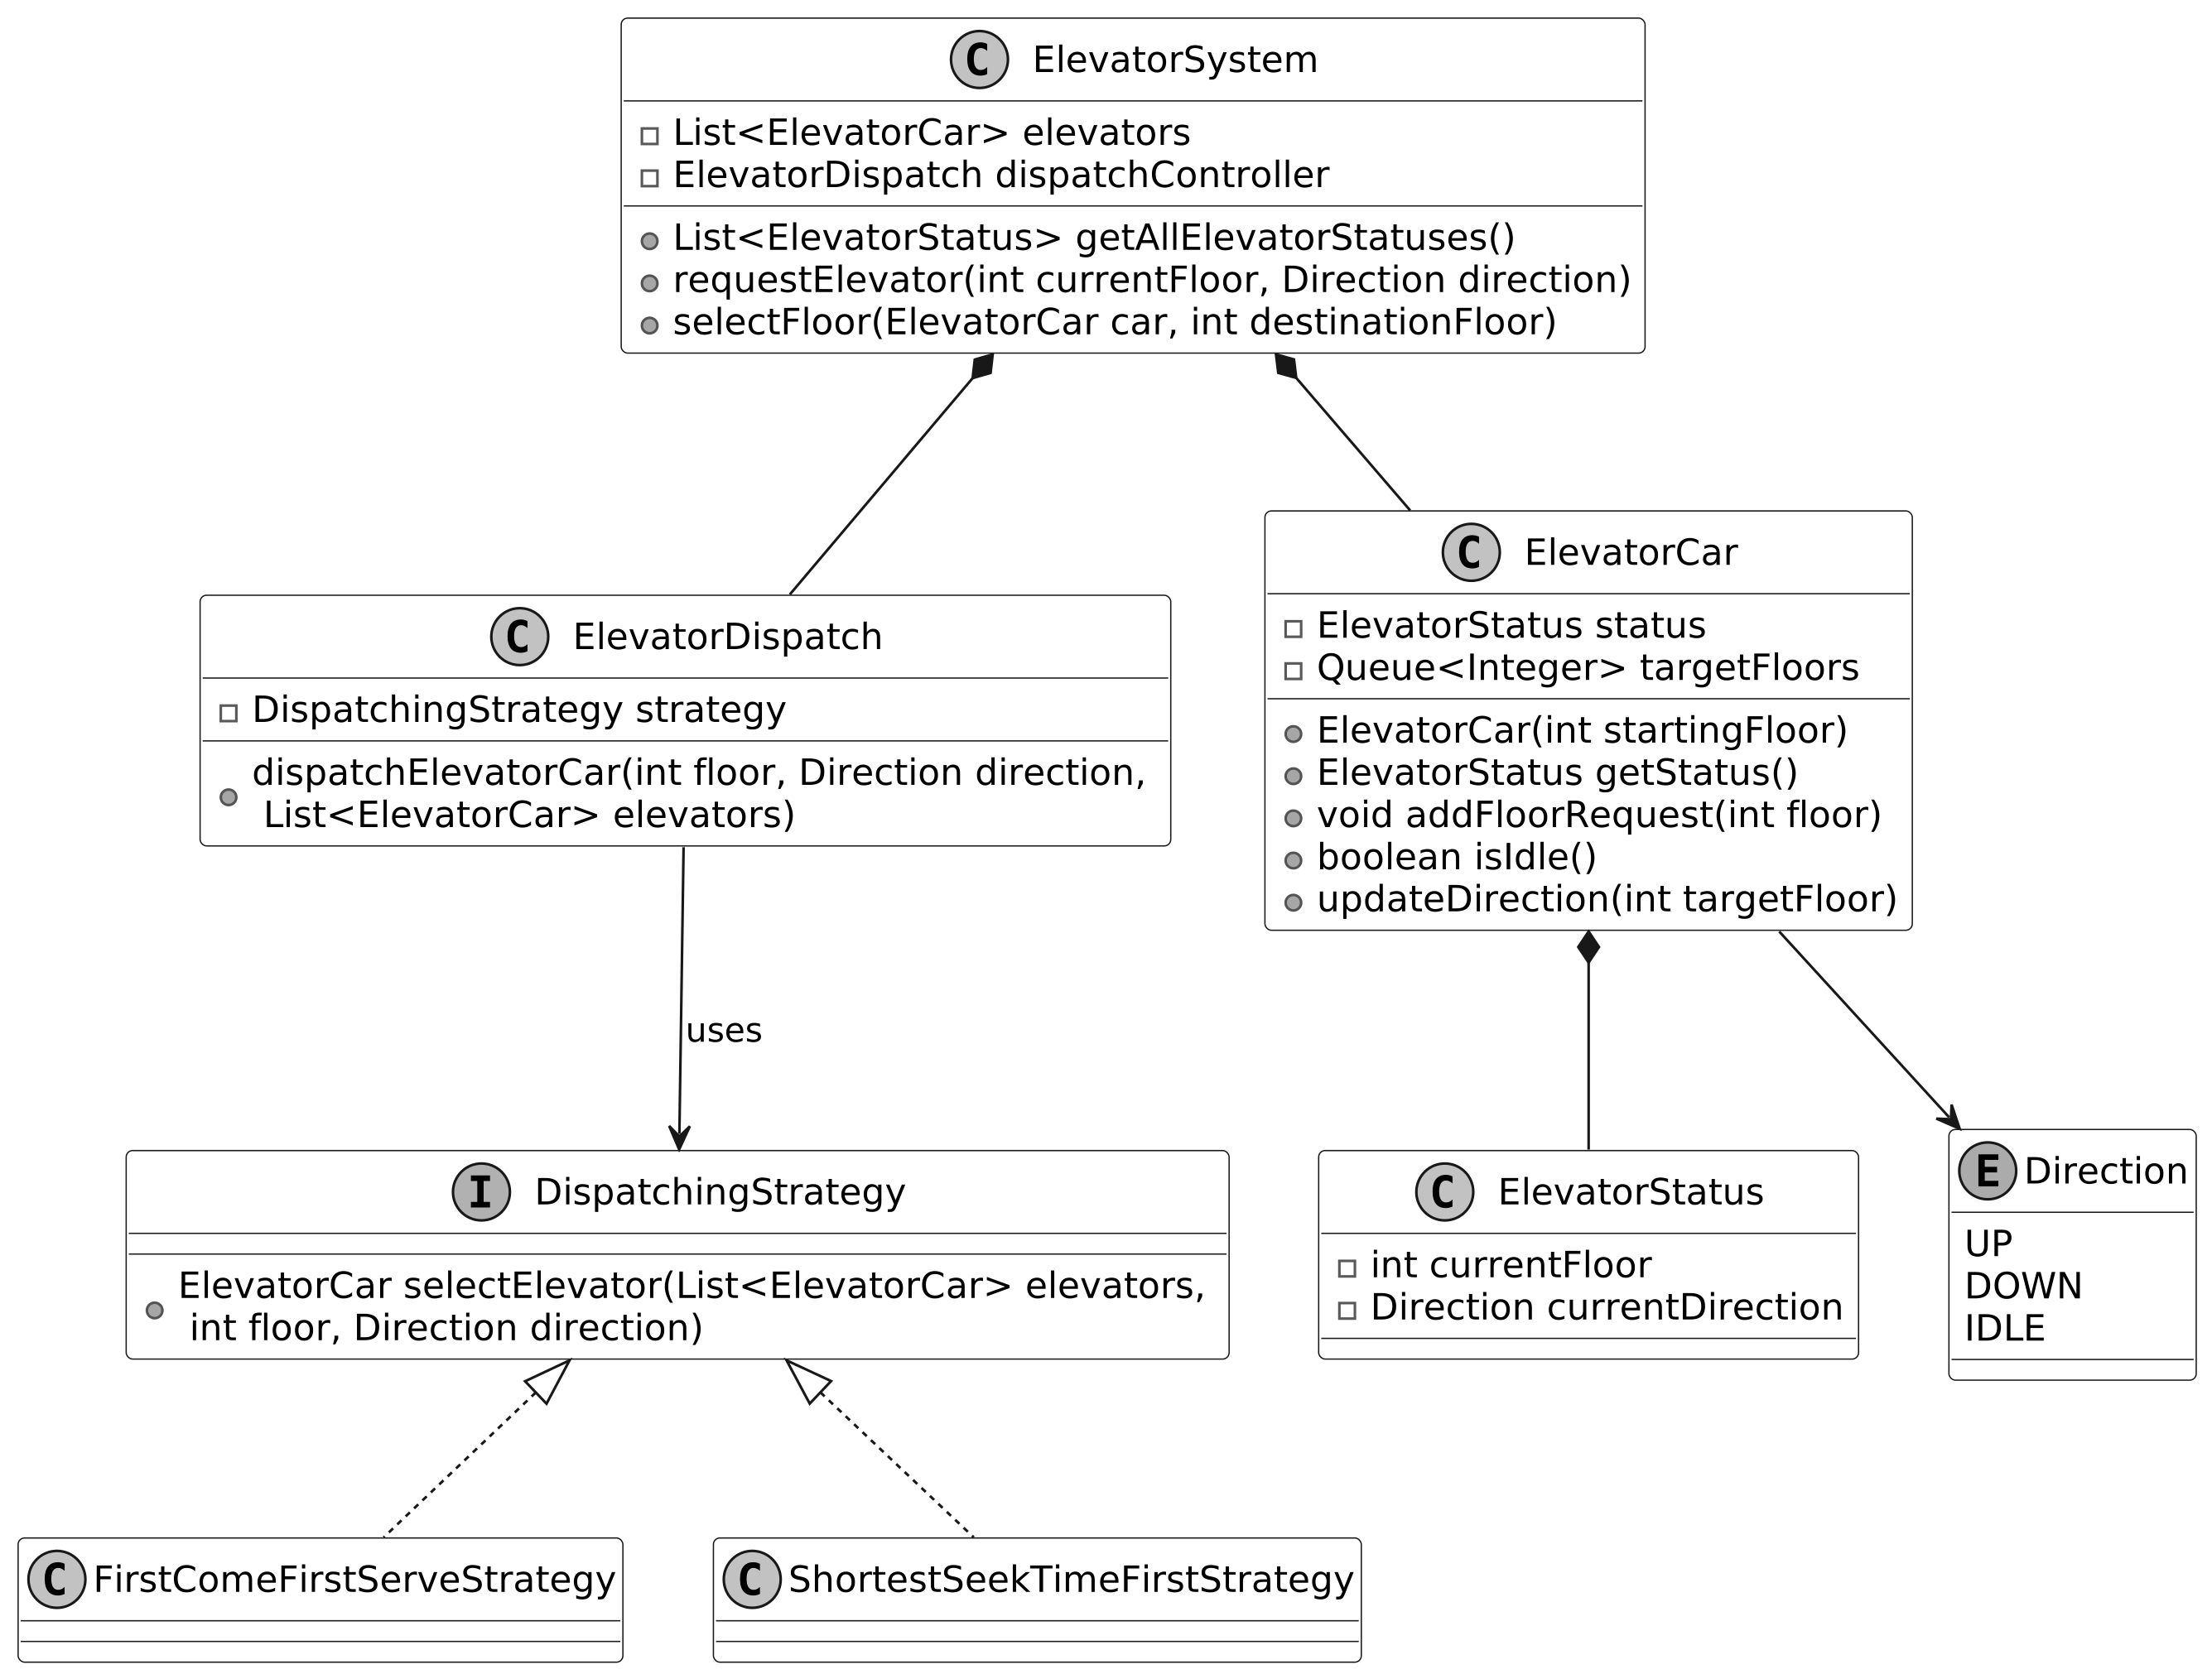
In this section, we’ll implement the core functionalities of the elevator system, focusing on key areas such as tracking elevator status, dispatching elevators efficiently, and simulating elevator movement.
Now, let’s define these classes and their key functionalities in detail.
The ElevatorSystem class is responsible for managing multiple ElevatorCar objects, using composition to simplify the management of these cars. It delegates the core task of dispatching requests to an instance of ElevatorDispatch.
The constructor of ElevatorSystem accepts two parameters:
By allowing the DispatchingStrategy to be passed into the constructor, the system can easily adapt to different dispatching strategies at runtime. This flexibility makes it easy to test different strategies and optimize the system's performance based on traffic patterns.
Here is the implementation of this class.
public class ElevatorSystem {

    private final List<ElevatorCar> elevators;
    private final ElevatorDispatch dispatchController;

    public ElevatorSystem(List<ElevatorCar> elevators, DispatchingStrategy strategy) {
        this.elevators = elevators;
        this.dispatchController = new ElevatorDispatch(strategy);
    }

    // Returns the current status of all elevators in the system
    public List<ElevatorStatus> getAllElevatorStatuses() {
        List<ElevatorStatus> statuses = new ArrayList<>();
        for (ElevatorCar elevator : elevators) {
            statuses.add(elevator.getStatus());
        }
        return statuses;
    }

    // Handles a request for an elevator from a specific floor and direction
    public void requestElevator(int currentFloor, Direction direction) {
        dispatchController.dispatchElevatorCar(currentFloor, direction, elevators);
    }

    // Handles a floor selection request from inside an elevator
    public void selectFloor(ElevatorCar car, int destinationFloor) {
        car.addFloorRequest(destinationFloor);
    }
}
The getAllElevatorStatuses method is designed to provide a consolidated view of the status of all elevators in the system. These statuses reflect real-time information about the elevator car, including its current floor and movement direction.
The ElevatorSystem class offers two primary methods for handling requests from users:
The ElevatorCar class models an individual elevator in the system. It keeps track of the elevator’s current floor, its movement direction, and the list of floors it needs to visit. The elevator uses a queue (targetFloors) to manage requests from hallway and floor buttons and ensures that no duplicate requests are added to the queue.
Below is the implementation of this class.
public class ElevatorCar {
    private ElevatorStatus status;
    private final Queue<Integer> targetFloors;

    public ElevatorCar(int startingFloor) {
        this.status = new ElevatorStatus(startingFloor, Direction.IDLE);
        this.targetFloors = new LinkedList<>();
    }

    // Returns the current state of the elevator
    public ElevatorStatus getStatus() {
        return status;
    }

    // Adds a new floor request if it's not already in the queue
    public void addFloorRequest(int floor) {
        if (!targetFloors.contains(floor)) {
            targetFloors.offer(floor);
            updateDirection(floor);
        }
    }

    // Checks if elevator has no pending floor requests
    public boolean isIdle() {
        return targetFloors.isEmpty();
    }

    // Updates elevator direction based on target floor position
    private void updateDirection(int targetFloor) {
        if (status.getCurrentFloor() < targetFloor) {
            status = new ElevatorStatus(status.getCurrentFloor(), Direction.UP);
        } else if (status.getCurrentFloor() > targetFloor) {
            status = new ElevatorStatus(status.getCurrentFloor(), Direction.DOWN);
        }
    }
    // getters are omitted for brevity
}
Implementation choice: We implemented the targetFloors collection as a Queue to manage the sequence of floors the elevator must visit. The Queue was chosen for its first-in-first-out (FIFO) behavior, which ensures that floor requests are processed in the order they are received, maintaining fairness for passengers. This structure supports constant-time operations for adding new floor requests and removing the next floor upon arrival.
Alternative approach: A PriorityQueue could have been used to sort floors by closeness or direction, saving travel time. However, reordering floors might confuse passengers expecting stops in request order and requires extra logic to prevent stops in the opposite direction of travel. A Queue may take slightly longer but is simpler, fairer, and matches how elevators typically work.
The ElevatorDispatch class is responsible for assigning and directing elevator cars to handle hallway requests using a specified dispatching strategy.
Below is the implementation of this class.
public class ElevatorDispatch {

    private final DispatchingStrategy strategy;

    public ElevatorDispatch(DispatchingStrategy strategy) {
        this.strategy = strategy;
    }

    // Handles requests from the hallway button and assigns an elevator based on the dispatching
    // strategy.
    public void dispatchElevatorCar(int floor, Direction direction, List<ElevatorCar> elevators) {
        ElevatorCar selectedElevator = strategy.selectElevator(elevators, floor, direction);
        if (selectedElevator != null) {
            selectedElevator.addFloorRequest(floor);
        }
    }
}
dispatchElevatorCar: This method is used when a user on a floor presses the hallway button. It uses the DispatchingStrategy to select the most appropriate elevator. Once an elevator is selected, the floor where the request was made is added to the elevator’s list of stops.
Alternative approach: An alternative could have been to maintain a priority queue of elevators, ordered by suitability (e.g., distance to the requested floor), to reduce selection time. However, maintaining a priority queue requires continuous updates as elevators move, adding overhead that outweighs the benefits for small elevator counts. The trade-off is that iterating over a list has linear time complexity, but this is acceptable given the typically small number of elevators and the need for strategy flexibility.
The DispatchingStrategy interface defines a contract for selecting an elevator from a list of available elevators based on a requested floor and desired direction. This interface abstracts the logic for handling requests and enables the system to switch between different dispatching algorithms.
First-Come-First-Serve Strategy
The FirstComeFirstServeStrategy selects the first elevator that is either idle (not moving) or moving in the direction of the request. If no idle or direction-compatible elevators are found, the strategy randomly selects an elevator from the list. This ensures that every request is fulfilled, even if no perfect match is available.
public class FirstComeFirstServeStrategy implements DispatchingStrategy {
    // Selects the first available elevator that is either idle or moving in the same direction
    @Override
    public ElevatorCar selectElevator(List<ElevatorCar> elevators, int floor, Direction direction) {
        for (ElevatorCar elevator : elevators) {
            // Return first elevator that is idle or moving in the same direction
            if (elevator.isIdle() || elevator.getCurrentDirection() == direction) {
                return elevator;
            }
        }
        // If no suitable elevator is found, randomly select one
        return elevators.get((int) (Math.random() * elevators.size()));
    }
}
Shortest-Seek-Time-First Strategy
The ShortestSeekTimeFirstStrategy prioritizes the elevator that is closest to the requested floor. It calculates the absolute distance between the current floor of each elevator and the requested floor and selects the elevator that can reach the requested floor the quickest. This strategy also takes into account whether the elevator is idle or moving in the correct direction.
public class ShortestSeekTimeFirstStrategy implements DispatchingStrategy {
    // Selects the elevator that is closest to the requested floor and moving in the same direction
    @Override
    public ElevatorCar selectElevator(List<ElevatorCar> elevators, int floor, Direction direction) {
        ElevatorCar bestElevator = null;
        int shortestDistance = Integer.MAX_VALUE;

        for (ElevatorCar elevator : elevators) {
            // Calculate distance between elevator and requested floor
            int distance = Math.abs(elevator.getCurrentFloor() - floor);
            // Select elevator if it's idle or moving in the same direction and closer than the
            // current best
            if ((elevator.isIdle() || elevator.getCurrentDirection() == direction)
                    && distance < shortestDistance) {
                bestElevator = elevator;
                shortestDistance = distance;
            }
        }

        return bestElevator;
    }
}
A runnable SCAN scheduler: the car sweeps up serving every request in its path, then reverses to serve the ones below — the classic elevator / disk-scan strategy that avoids wasteful back-and-forth.
class ElevatorController:
    """Serves requests in SCAN order: sweep one way, then reverse."""

    def __init__(self):
        self.pending = set()

    def request(self, floor):
        self.pending.add(floor)

    def run(self, start, direction):
        lines = []
        lines.append("Requests: " + str(sorted(self.pending)))
        lines.append("Start at floor %d heading %s" % (start, direction))

        above = sorted(f for f in self.pending if f >= start)
        below = sorted((f for f in self.pending if f < start), reverse=True)

        if direction == "UP":
            first, second, other_dir = above, below, "DOWN"
        else:
            first, second, other_dir = below, above, "UP"

        for floor in first:
            lines.append("Stop at floor %d" % floor)
        if second:
            lines.append("Reverse -> " + other_dir)
            for floor in second:
                lines.append("Stop at floor %d" % floor)
        lines.append("Done")
        return "\n".join(lines)


def main():
    controller = ElevatorController()
    for floor in [5, 1, 3, 6, 2]:
        controller.request(floor)
    print(controller.run(3, "UP"))


if __name__ == "__main__":
    main()
#include <iostream>
#include <string>
#include <vector>
#include <set>
#include <algorithm>
// Serves requests in SCAN order: sweep one way, then reverse.
class ElevatorController {
std::set<int> pending; // std::set keeps floors sorted
public:
void request(int floor) { pending.insert(floor); }
std::string run(int start, const std::string& direction) {
std::vector<std::string> lines;
std::string reqs = "[";
bool firstReq = true;
for (int f : pending) { if (!firstReq) reqs += ", "; reqs += std::to_string(f); firstReq = false; }
reqs += "]";
lines.push_back("Requests: " + reqs);
lines.push_back("Start at floor " + std::to_string(start) + " heading " + direction);
std::vector<int> above, below;
for (int f : pending) { if (f >= start) above.push_back(f); else below.push_back(f); }
std::sort(above.begin(), above.end());
std::sort(below.begin(), below.end(), std::greater<int>());
std::vector<int> first, second;
std::string otherDir;
if (direction == "UP") { first = above; second = below; otherDir = "DOWN"; }
else { first = below; second = above; otherDir = "UP"; }
for (int floor : first) lines.push_back("Stop at floor " + std::to_string(floor));
if (!second.empty()) {
lines.push_back("Reverse -> " + otherDir);
for (int floor : second) lines.push_back("Stop at floor " + std::to_string(floor));
}
lines.push_back("Done");
std::string out;
for (std::size_t i = 0; i < lines.size(); ++i) { if (i) out += "\n"; out += lines[i]; }
return out;
}
};
int main() {
ElevatorController controller;
int requests[] = {5, 1, 3, 6, 2};
for (int f : requests) controller.request(f);
std::cout << controller.run(3, "UP") << "\n";
return 0;
}import java.util.ArrayList;
import java.util.Collections;
import java.util.List;
import java.util.TreeSet;
// Serves requests in SCAN order: sweep one way, then reverse.
class ElevatorController {
private final TreeSet<Integer> pending = new TreeSet<>();
void request(int floor) { pending.add(floor); }
String run(int start, String direction) {
List<String> lines = new ArrayList<>();
lines.add("Requests: " + pending);
lines.add("Start at floor " + start + " heading " + direction);
List<Integer> above = new ArrayList<>();
List<Integer> below = new ArrayList<>();
for (int f : pending) {
if (f >= start) above.add(f); else below.add(f);
}
Collections.sort(above);
below.sort(Collections.reverseOrder());
List<Integer> first, second;
String otherDir;
if (direction.equals("UP")) { first = above; second = below; otherDir = "DOWN"; }
else { first = below; second = above; otherDir = "UP"; }
for (int floor : first) lines.add("Stop at floor " + floor);
if (!second.isEmpty()) {
lines.add("Reverse -> " + otherDir);
for (int floor : second) lines.add("Stop at floor " + floor);
}
lines.add("Done");
return String.join("\n", lines);
}
}
public class Main {
public static void main(String[] args) {
ElevatorController controller = new ElevatorController();
for (int floor : new int[]{5, 1, 3, 6, 2}) controller.request(floor);
System.out.println(controller.run(3, "UP"));
}
}Sample run — identical across all three languages:
Requests: [1, 2, 3, 5, 6]
Start at floor 3 heading UP
Stop at floor 3
Stop at floor 5
Stop at floor 6
Reverse -> DOWN
Stop at floor 2
Stop at floor 1
DoneIn the current design, both hallway button requests and floor button requests are added to the same queue of pending stops within the elevator car. When a user presses a hallway button, the dispatch controller assigns the most suitable elevator and adds the request to that elevator’s queue. Similarly, when a user selects a destination floor using the floor buttons inside the elevator, the request is directly added to the same queue.
While this design works, it has some limitations:
To address these limitations, we introduce an event-driven approach using the Observer Pattern. This approach decouples the hallway buttons from the dispatch controller, allowing them to interact through event-driven notifications instead of relying on the sequential processing of a queue.
How it works:
Note: To learn more about the Observer Pattern and its common use cases, refer to the Further Reading section at the end of this chapter.
Below is the implementation of the observer pattern for handling hallway call requests:
// Observable Subject: HallwayButtonPanel
public class HallwayButtonPanel {
    private final int floor;
    private final List<ElevatorObserver> observers;

    public HallwayButtonPanel(int floor) {
        this.floor = floor;
        this.observers = new ArrayList<>();
    }

    // Handles button press event and notifies all registered observers
    public void pressButton(Direction direction) {
        notifyObservers(direction);
    }

    // Registers a new observer to receive button press notifications
    public void addObserver(ElevatorObserver observer) {
        observers.add(observer);
    }

    // Notifies all registered observers about the button press
    private void notifyObservers(Direction direction) {
        for (ElevatorObserver observer : observers) {
            observer.update(floor, direction);
        }
    }
}

// Observer Interface
public interface ElevatorObserver {
    void update(int floor, Direction direction);
}

// Observer Implementation: ElevatorDispatchController
public class ElevatorDispatchController implements ElevatorObserver {
    @Override
    public void update(int floor, Direction direction) {
        // Logic to handle the floor request
    }
}
Why it’s better:
In the existing design, all elevators can stop at every floor. What if the building has certain elevators that only stop at specific floors?
In order to fulfill such a requirement, the design should allow each elevator car to be assigned a defined set of accessible floors and ensure the system assigns hallway button requests only to elevators that can stop at the requested floor.
How It Works:
Example Scenario: Suppose the building has 20 floors. Elevator 1 serves only floors 1, 5, 10, 15, and 20. Elevator 2 serves all the floors. When a user on the 3rd floor presses the "up" button, the system avoids assigning Elevator 1 since it cannot stop at floor 3. Elevator 2 will be chosen instead.
Update the ElevatorCar class:
We introduce the accessibleFloors attribute to store the list of floors each elevator can serve.
// Set of floors this elevator can service
private final Set<Integer> accessibleFloors;
Modify the addFloorRequest method:
Before adding a floor to the elevator’s list of stops, check whether the floor is part of the elevator’s accessible set.
public void addFloorRequest(int floor) {
    // Only add the request if the floor is accessible by this elevator and not already in the
    // queue
    if (accessibleFloors.contains(floor) && !targetFloors.contains(floor)) {
        targetFloors.offer(floor);
        updateDirection(floor);
    }
}
Update dispatching strategies:
The DispatchingStrategy implementations will ensure that only elevators capable of reaching the requested floor are considered for assignment. For example, in the Shortest Seek Time First strategy, add an additional check:
public class ShortestSeekTimeFirstStrategy implements DispatchingStrategy {
    @Override
    public ElevatorCar selectElevator(List<ElevatorCar> elevators, int floor, Direction direction) {
        ElevatorCar bestElevator = null;
        int shortestDistance = Integer.MAX_VALUE;

        for (ElevatorCar elevator : elevators) {
            // Calculate distance between elevator and requested floor
            int distance = Math.abs(elevator.getCurrentFloor() - floor);
            // Select elevator if it's idle or moving in the same direction and closer than the
            // current best
            if ((elevator.isIdle() || elevator.getCurrentDirection() == direction)
                    // Only consider elevators that can actually reach the requested floor
                    && elevator.getAccessibleFloors().contains(floor)
                    && distance < shortestDistance) {
                bestElevator = elevator;
                shortestDistance = distance;
            }
        }

        return bestElevator;
    }
}
In this chapter, we designed an Elevator System by following a structured approach, similar to how a candidate would solve this problem during an OOD interview. We began by gathering and clarifying requirements through a series of questions and answers with the interviewer. This was followed by identifying the core objects involved, designing the class diagram, and implementing key components of the system.
A key takeaway from this design is the importance of modularity and clear separation of concerns. Each component, such as ElevatorSystem, ElevatorCar, ElevatorDispatch, and DispatchingStrategy, focuses on a specific responsibility, ensuring that the system is maintainable, scalable, and flexible. This modular design allows the system to easily adapt to different dispatching strategies and optimize performance for various building traffic conditions.
In the deep dive section, we explored advanced topics, including using the Observer Pattern for event-driven hallway call requests, where pressing the hallway buttons instantly notifies the dispatch controller, enabling faster elevator assignments. We also discussed handling elevators that serve different sets of floors.
Congratulations on getting this far! Now give yourself a pat on the back. Good job!
This section gives a quick overview of the design patterns used in this chapter. It’s helpful if you’re new to these patterns or need a refresher to better understand the design choices.
The Observer is a behavioral pattern that lets you define a subscription mechanism, allowing multiple objects to receive notifications and updates automatically whenever the object they are observing changes state.
In the elevator system design, we use the Observer pattern to decouple hallway button presses from the dispatch controller, enabling efficient event-driven request handling. To illustrate the Observer pattern in another domain, the following example uses a news application.
Problem
Imagine you're developing a news application that delivers real-time updates to its users. Whenever a breaking news story is published, all users who have subscribed to that category should receive immediate notifications. Implementing this functionality can be challenging as directly linking the news publisher to each user would result in a tightly coupled design, making the system rigid and difficult to maintain. Additionally, as the user base grows, the system must efficiently manage the distribution of updates without becoming a bottleneck.
Solution
The Observer design pattern offers an elegant solution to this problem by establishing a one-to-many relationship between the publisher (news provider) and subscribers (users).
In this pattern:
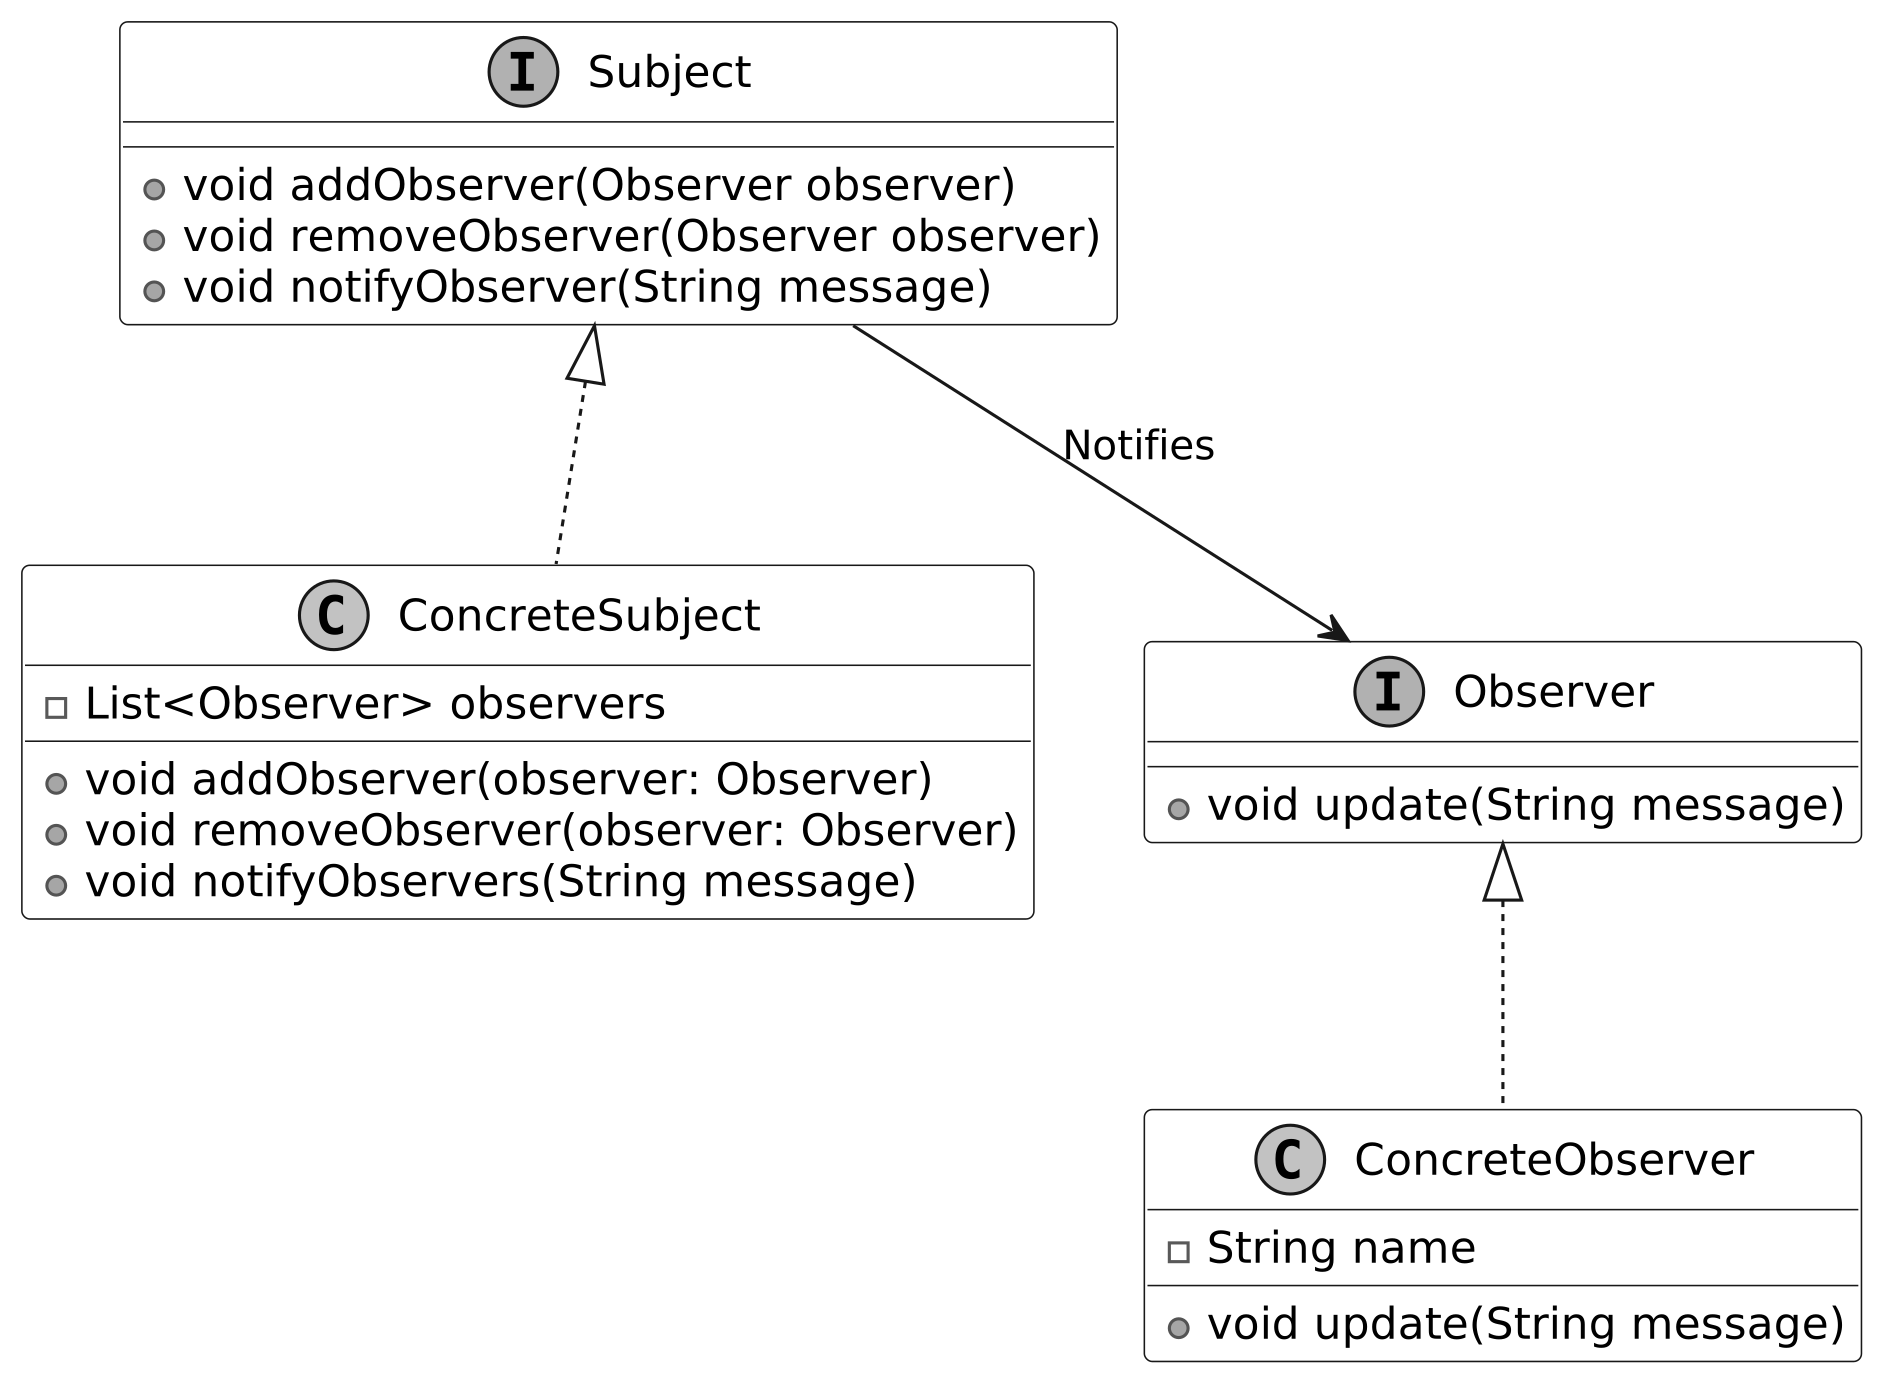
When to use
The Observer design pattern is particularly useful in scenarios where: