In this chapter, we will explore the design of a vending machine system that allows users to select and purchase products, dispense items, manage inventory, and process payments. Although real-world vending machines involve hardware components, like coin dispensers, card readers, and touchscreens, we’ll focus on modeling the system’s states, data, and core functionality.
New here? In plain terms, this is what we’re building and why — with an everyday analogy to anchor your intuition before the deep dive below.
A vending machine only makes sense as a set of states: idle → money inserted → product selected → dispensing → back to idle. Each state permits only certain actions (you can't get a snack before paying). Modelling those states as objects makes the rules explicit and impossible to skip.
Here is an example of a typical prompt an interviewer might give:
“Imagine you’re at a vending machine, craving a snack. You insert some cash, select your favorite item, and within seconds, it drops into the tray. The machine also gives you the right change if needed. Behind the scenes, the system is working smoothly to track inventory, handle payments, and make sure everything runs efficiently. Now, let’s design a vending machine that does all this.”
Here is an example of how a conversation between a candidate and an interviewer might unfold:
Candidate: Does the vending machine support different types of products?
Interviewer: Yes, the vending machine supports a variety of products, such as snacks, beverages, and other items.
Candidate: How are products organized within the vending machine? Are they placed in specific racks or arranged differently? Also, I assume each product needs a unique identifier, like a product code, along with attributes such as its price.
Interviewer: Yes, products are placed in specific racks, with each rack holding only one type of product at a time. Each product also has a unique product code and a price tag.
Candidate: How will payments be processed in the vending machine?
Interviewer: The vending machine should only accept cash payments and calculate change if needed.
Candidate: How does the vending machine handle cases where a user selects a product that is out of stock or unavailable?
Interviewer: In such cases, the system should be able to check if a product is available. If not, it should display an error message to the user.
Candidate: If a user inserts money less than the product’s full price, can they add more incrementally?
Interviewer: For this design, let’s assume users insert the full amount in one step. If the inserted amount is insufficient, the vending machine should return the money and display an error.
Candidate: Are there any restrictions on who can access the vending machine?
Interviewer: Access to the vending machine is available to users and admins, with different privileges. Users should be able to select and purchase products by specifying the product code. Admins, however, are responsible for adding or removing products from the machine.
Candidate: Are there any security or inventory tracking requirements for the vending machine?
Interviewer: Yes. The vending machine should track inventory, and only the admin can add or remove products.
Here are the functional requirements based on the conversation:
Below are the non-functional requirements:
A use case diagram illustrates how actors (users or the system) interact with the vending machine system to achieve specific goals. This diagram helps clarify key actions, such as inserting money, selecting a product, dispensing items, and managing inventory.
Below is the use case diagram of the vending machine system.
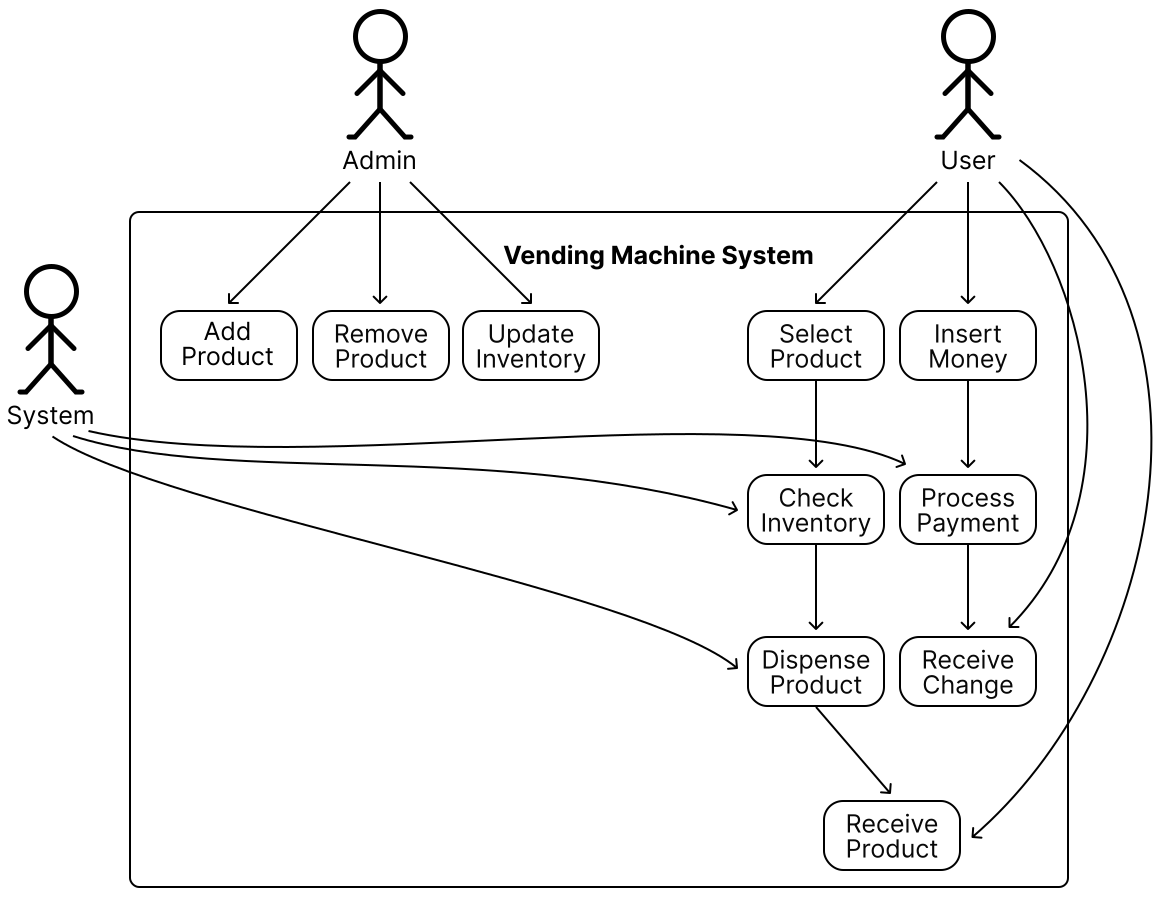
The use cases for the User actor are as follows:
The use cases for the Admin actor are as follows:
The use cases for the System actor are as follows.
Before diving into the design, it’s important to enumerate the core objects and give them appropriate names. These objects will form the foundation of the vending machine’s structure and functionality.

Design choice: Products are linked to racks because racks represent the physical storage locations, and products are associated with racks since they are static entities that don’t manage their storage. This aligns with the single responsibility principle. Alternatively, racks could be linked to products, but this would violate the single responsibility principle, as racks need to manage product details.
Now that we know the core objects and their roles, the next step is to create classes and methods to build the vending machine system.
The first component in our class diagram is the Product class, which represents a basic product within the vending machine. It includes attributes such as product code, description, and the price of the product.
While additional attributes could be added for completeness, we skip them for this exercise. During the interview, it’s a good idea to acknowledge these other attributes but focus on the essential attributes to save time and stay aligned with requirements.
Below is the representation of this class.
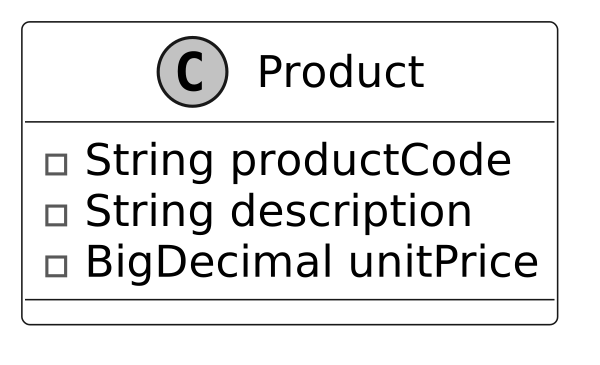
Design choice: One thing to note is that we have not modeled the inventory quantity within the product class. The product class encapsulates innate properties like its code, description, and price. The stock level of our vending machine racks is constantly changing. Recognizing this distinction supports cleaner object decomposition and adherence to the single responsibility principle. We introduce a separate InventoryManager class to manage stock levels.
Next, we will look at the Rack class, which models a single rack space within the vending machine. Each rack is associated with a single product and can hold multiple units of that product.
We will put multiple racks together via the composition technique to represent the inventory spaces within the vending machine.
Here is the representation of this class.
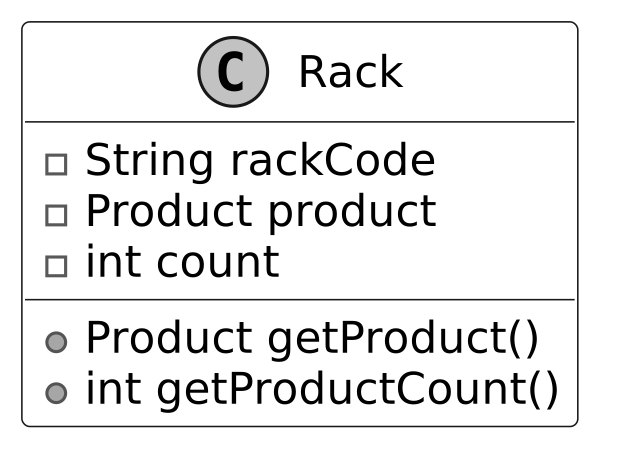
Design choice: We chose not to have the Rack class include methods like dispenseProductFromRack. Instead, we kept the Rack class focused on managing inventory count and product information, delegating actions like dispensing to a higher-level class, such as InventoryManager, which aligns with the single responsibility principle.
Building on the Rack class, the InventoryManager class handles the tracking and storage of products in the vending machine. It supports operations such as adding, removing, and dispensing products during user interactions. It will interface with hardware mechanisms that dispense items from the rack.
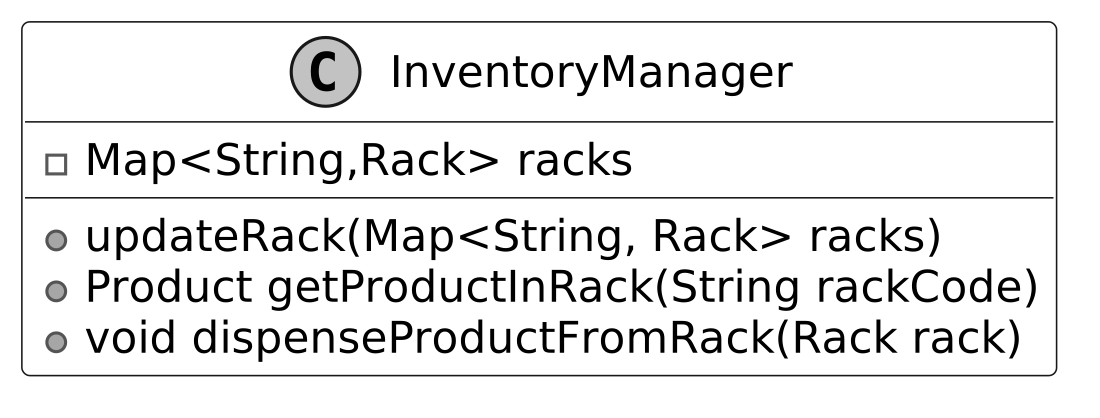
Key method: The dispenseProductFromRack method executes the action of dispensing product from the rack and decrements the inventory level. Pay attention to the naming of dispenseProductFromRack and getProductInRack. To avoid ambiguity, we should follow conventions and reserve the “get” prefix for getters that return attributes.
The updateRack method allows for editing product offerings or inventory levels. This allows an admin to edit the state of the rack.
Design choice: When managing collections like racks in InventoryManager, we must decide whether to expose the collection directly, a copy, or specific methods. The choice should balance flexibility and control. Here, we use updateRack(Map racks) to allow administrative components to replace the entire rack structure in one operation, suitable for bulk updates. For most cases, we prefer granular methods like addRack(Rack rack) and removeRack(Rack rack) to limit modifications to individual racks, reducing the risk of unintended changes. These methods are used for read access, aligning with the vending machine’s needs. To enhance safety, consider immutable collections or defensive copying to prevent unintended modifications and ensure thread safety in multi-threaded environments.
With inventory management addressed, we now turn to the PaymentProcessor class. This class manages payment acceptance, including tracking the current balance and returning change. This will interface with a coin receptacle or a credit card processing unit if supported.
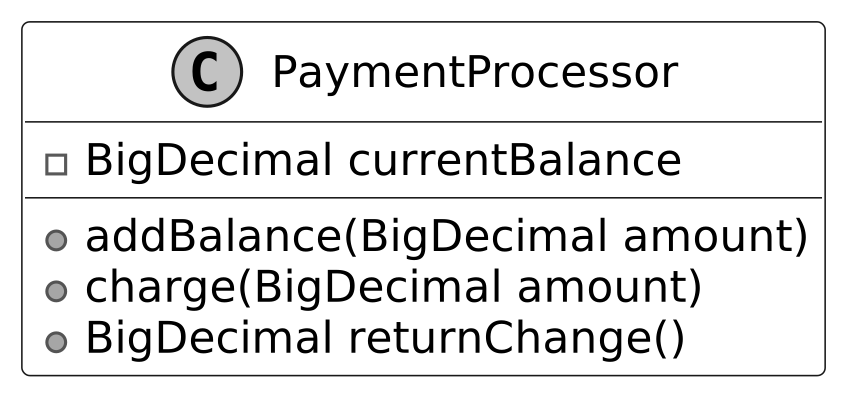
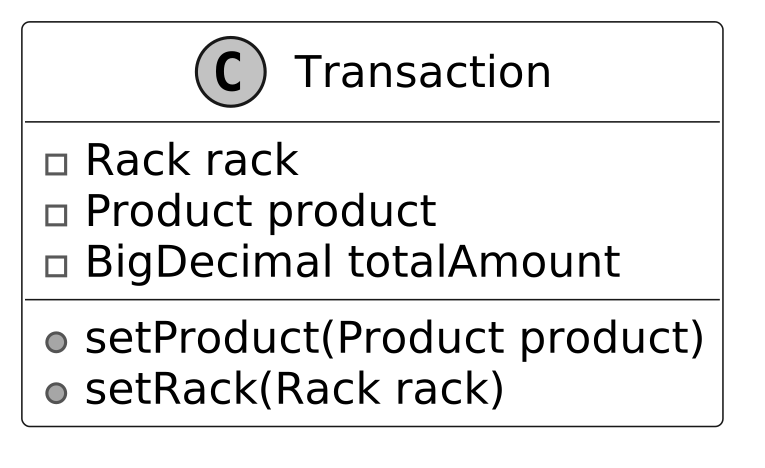
In a vending machine system, purchases involve multiple steps, including product selection, payment processing, and confirmation. While components like PaymentProcessor handle payments and InventoryManager manage stock, the Transaction class acts as a data structure that tracks the current state of a purchase.
This design provides several benefits.
Below is the representation of this class.
This class serves as the core component of the system. Here is the representation of the class:
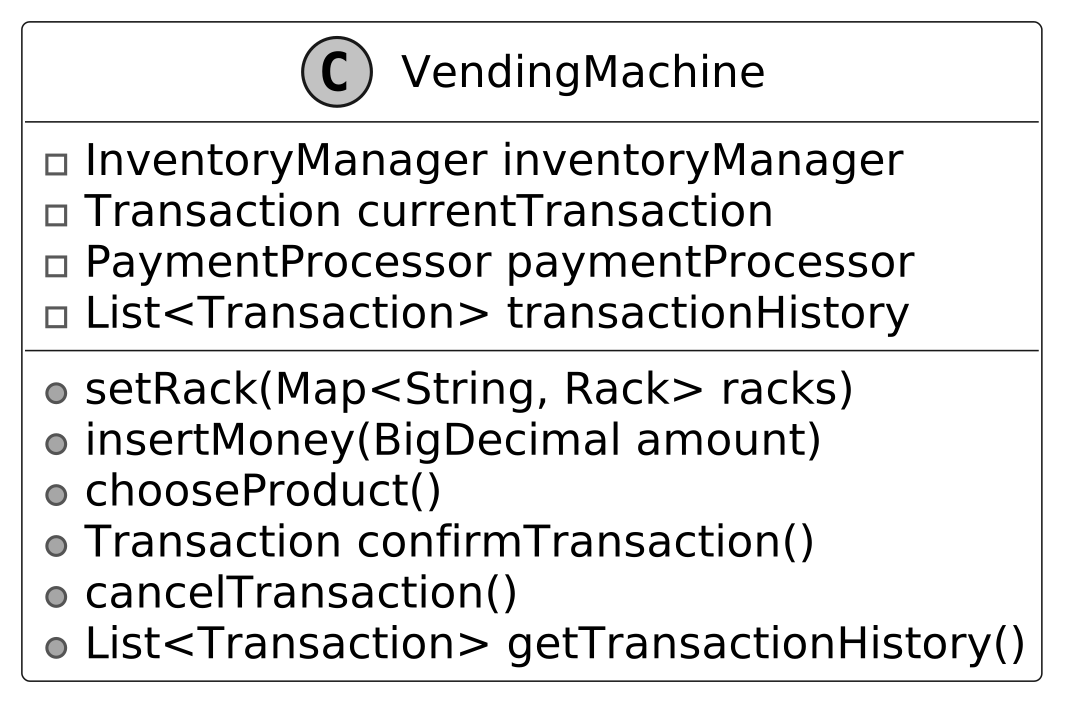
The VendingMachine class models a vending machine's behavior, processes payments, and manages inventory.
Design pattern: The Vending Machine uses the Facade pattern to provide a single interface to the clients of the Vending Machine. The term client refers to the software or hardware interfaces of the vending machine rather than any individual users.
Note: To learn more about the Facade pattern and its common use cases, refer to the Parking Lot chapter of this chapter.
Design choice: To prevent the VendingMachine class from becoming a “god object” (a class with too many responsibilities), facades should remain lightweight and delegate tasks to other classes that adhere to the single responsibility principle. For example, the vending machine delegates product management to the InventoryManager and payment handling to the PaymentProcessor.
Below is the complete class diagram of our vending machine system:
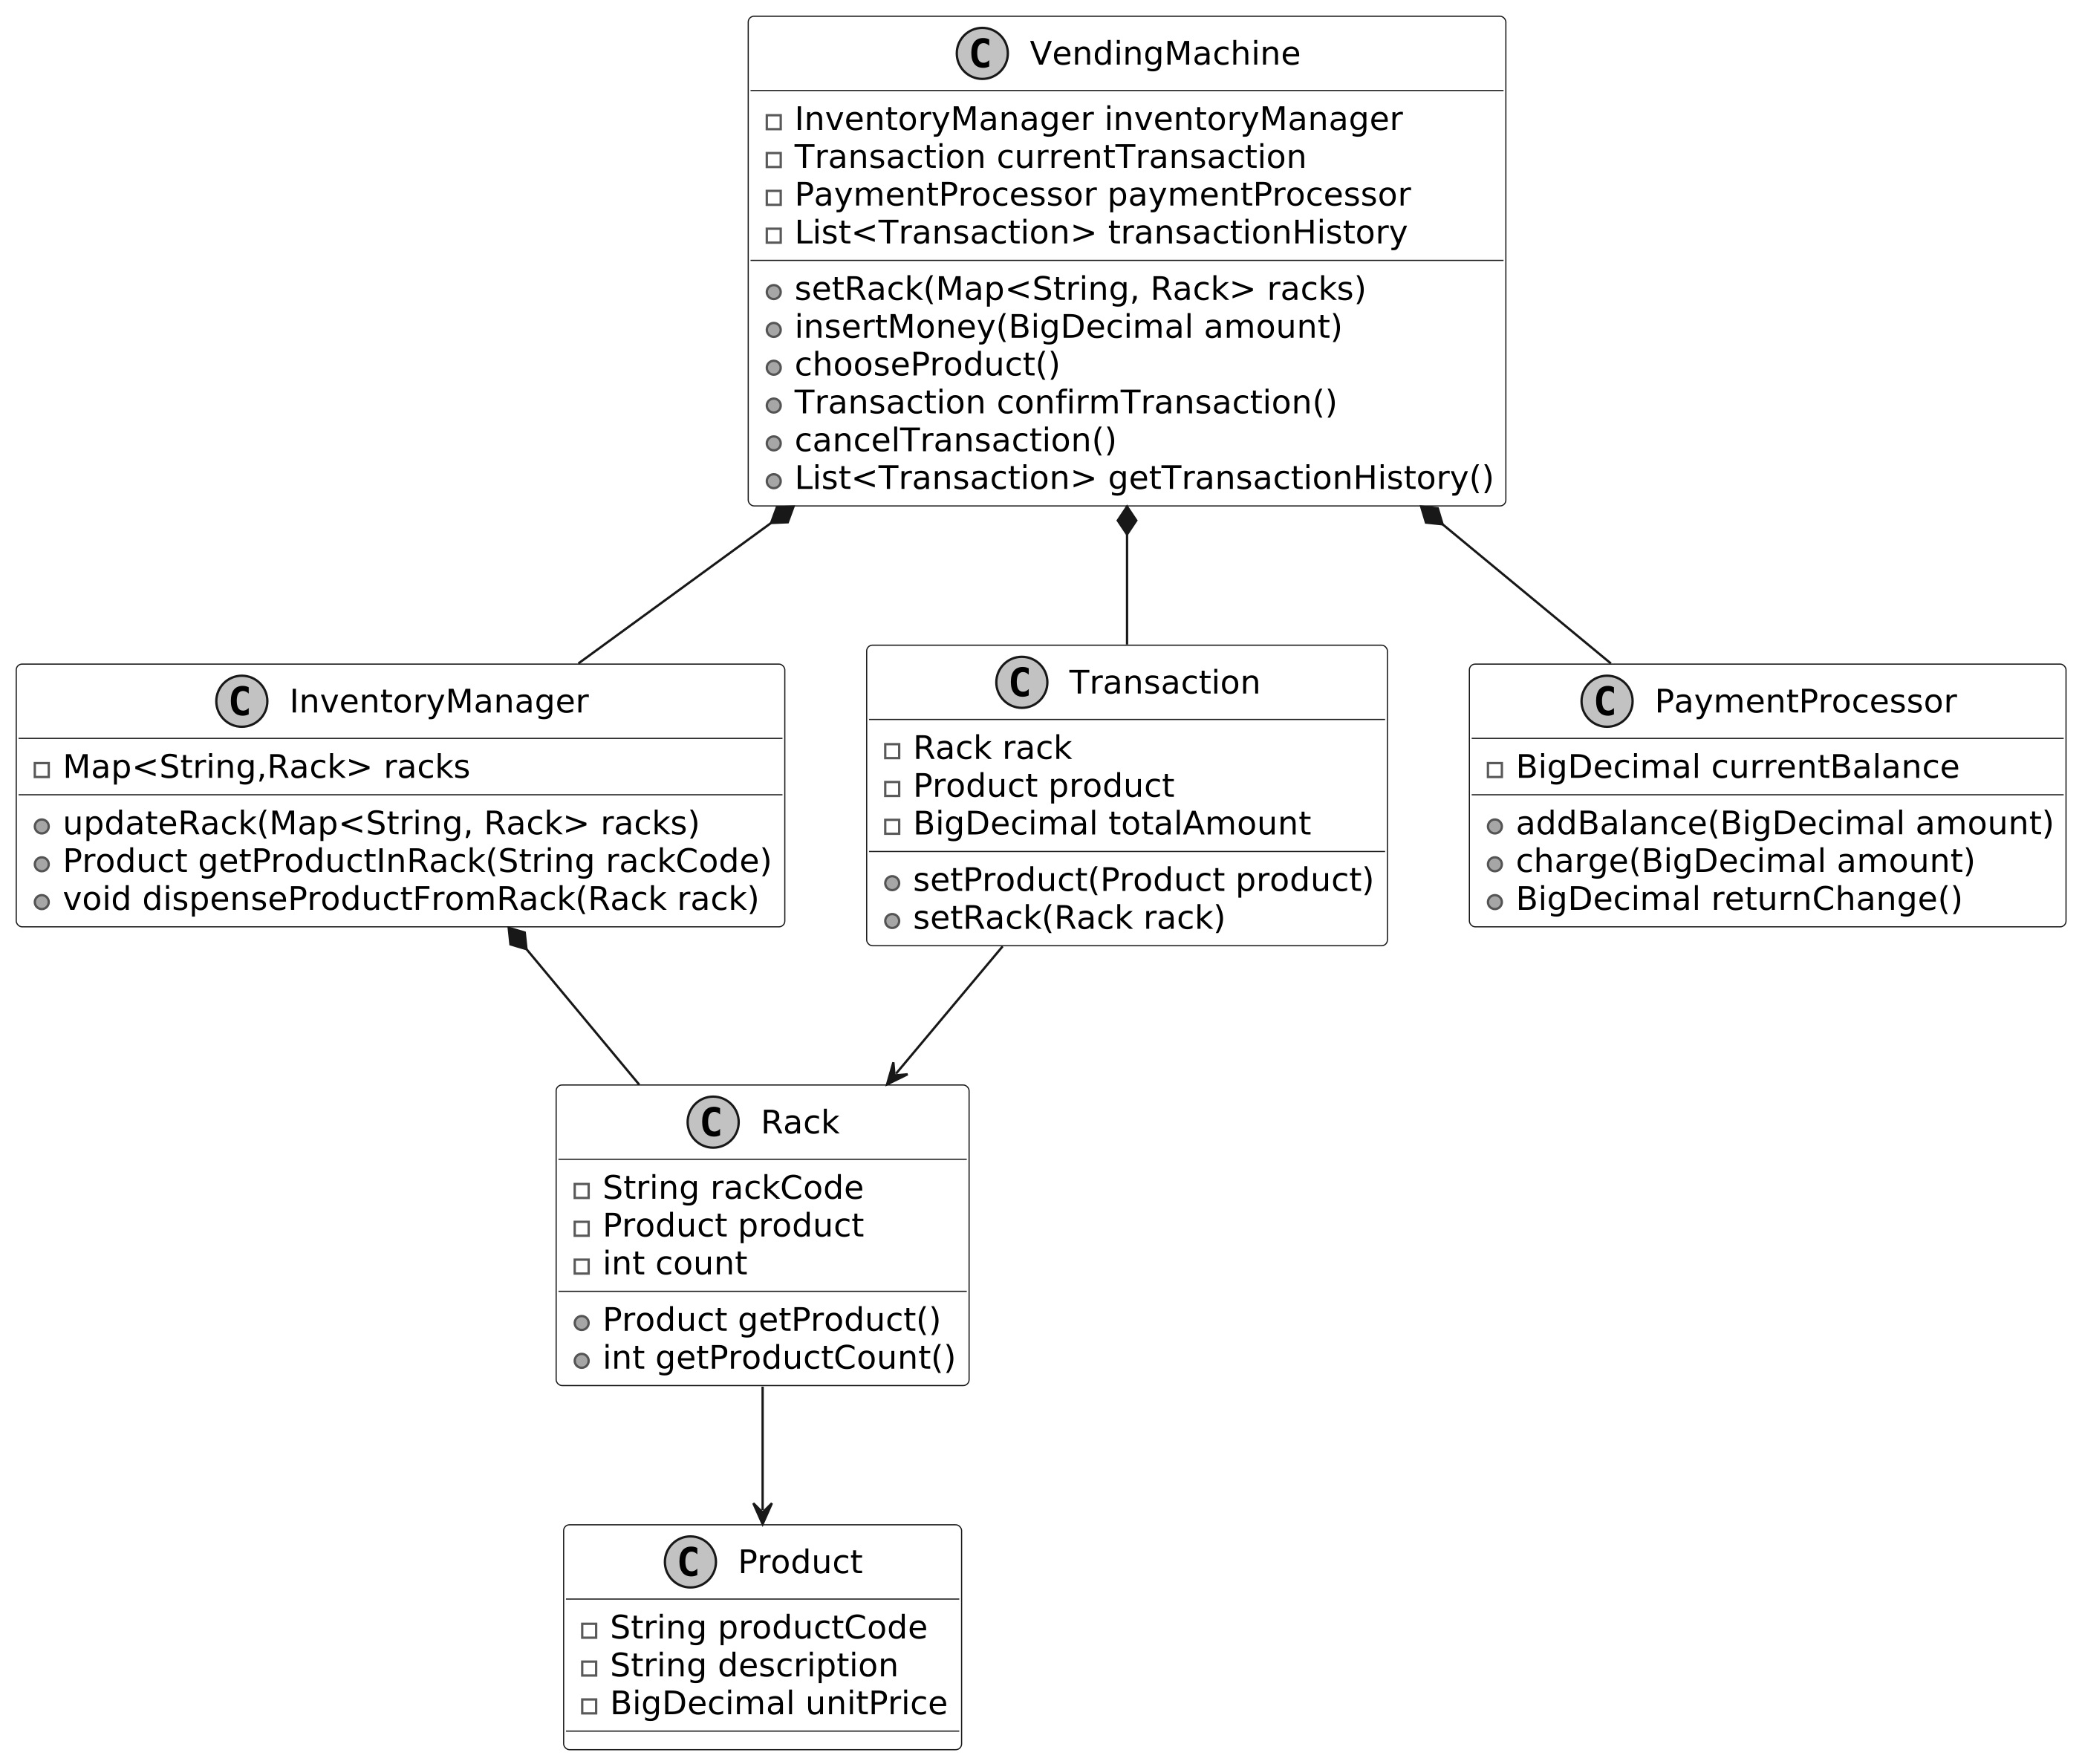
In this section, we’ll implement the core functionalities of the vending machine system, focusing on key areas such as managing product inventory, processing cash payments, and handling product selection and dispensing.
We will start by implementing the Product class, which represents a basic unit of a product in the context of a vending machine. The definition of the Product class is given below:
class Product {
    final String productCode;
    final String description;
    final BigDecimal unitPrice;

    public Product(String productCode, String description, BigDecimal unitPrice) {
        this.productCode = productCode;
        this.description = description;
        this.unitPrice = unitPrice;
    }
}
Implementation choice: For monetary values like the unitPrice attribute, we recommend using BigDecimal for its precision and rounding control. For an interview, it is also acceptable to use an integer to represent the smallest unit of currency (e.g., cents for US dollars) to save time. Avoid using float or double for currency, as they introduce precision/rounding errors. For identifiers like productCode, we recommend using a string rather than a numeric type in your code, even if the values are digits, you will most likely not be performing calculations, but string operations.
Next, we implement the InventoryManager and Rack classes, which work together to manage the vending machine’s inventory. By using the Composite design pattern, we create a hierarchical structure for handling inventory at multiple levels. The InventoryManager class manages the overall inventory, while the Rack class handles individual storage units.
We use a HashMap<String, Rack> to store racks because it allows for efficient lookups by rack code. Since each rack has a unique identifier, a hash map provides constant-time (O(1)) access when retrieving or updating a rack. This makes it well-suited for managing inventory in a vending machine, where quick access to product storage is important.
Below is the representation of the two classes:
public class InventoryManager {
    // Maps rack codes to their corresponding rack objects
    private Map<String, Rack> racks;

    public InventoryManager() {
        racks = new HashMap<>();
    }

    // Retrieves the product from a specific rack using its code
    public Product getProductInRack(String rackCode) {
        return racks.get(rackCode).getProduct();
    }

    // Dispenses a product from the specified rack and decrements its count
    public void dispenseProductFromRack(Rack rack) {
        if (rack.getProductCount() > 0) {
            rack.setCount(rack.getProductCount() - 1);
        } else {
            throw new IllegalStateException("Cannot dispense product. Rack is empty.");
        }
    }

    public void updateRack(Map<String, Rack> racks) {
        this.racks = racks;
    }

    public Rack getRack(String name) {
        return racks.get(name);
    }
}
Rack class
The Rack class represents individual storage units in the vending machine, each associated with a single product type.
public class Rack {
    private final String rackCode;
    private final Product product;
    private int count;

    public Rack(final String rackCode, final Product product, final int count) {
        this.rackCode = rackCode;
        this.product = product;
        this.count = count;
    }

    public Product getProduct() {
        return product;
    }

    public int getProductCount() {
        return count;
    }
}
The PaymentProcessor class handles payment-related operations, such as adding funds, charging for purchases, and returning change. This ensures the vending machine’s financial logic is encapsulated and easily maintainable.
public class PaymentProcessor {
    // Tracks the current balance in the payment processor
    private BigDecimal currentBalance = BigDecimal.ZERO;

    // Adds the specified amount to the current balance
    public void addBalance(BigDecimal amount) {
        currentBalance = currentBalance.add(amount);
    }

    // Deducts the specified amount from the current balance
    public void charge(BigDecimal amount) {
        currentBalance = currentBalance.subtract(amount);
    }

    // Returns the current balance as change and resets the balance to zero
    public BigDecimal returnChange() {
        BigDecimal change = currentBalance;
        currentBalance = BigDecimal.ZERO;
        return change;
    }

    // Returns the current balance
    public BigDecimal getCurrentBalance() {
        return currentBalance;
    }
}
Finally, we implement the VendingMachine class, a central component in the vending machine that is responsible for modeling the vending machine’s behavior and handling user interactions.
Below is the implementation of this class.
class VendingMachine {
    // Stores the history of all completed transactions
    private final List<Transaction> transactionHistory;
    // Manages the inventory of products in the vending machine
    private final InventoryManager inventoryManager;
    // Handles all payment-related operations
    private final PaymentProcessor paymentProcessor;

    // Tracks the current ongoing transaction
    private Transaction currentTransaction;
    // Represents the current state of the vending machine
    private VendingMachineState currentState;
    // Tracks the current balance in the machine
    private double balance;
    // Stores the currently selected product code
    private String selectedProduct;

    public VendingMachine() {
        transactionHistory = new ArrayList<>();
        currentTransaction = new Transaction();
        inventoryManager = new InventoryManager();
        paymentProcessor = new PaymentProcessor();
        this.currentState = new NoMoneyInsertedState();
        this.balance = 0.0;
        this.selectedProduct = null;
    }

    // Updates the rack configuration with new product racks
    void setRack(Map<String, Rack> rack) {
        inventoryManager.updateRack(rack);
    }

    // Adds money to the payment processor
    void insertMoney(final BigDecimal amount) {
        paymentProcessor.addBalance(amount);
    }

    // Selects a product from a specific rack
    void chooseProduct(String rackId) {
        final Product product = inventoryManager.getProductInRack(rackId);
        currentTransaction.setRack(inventoryManager.getRack(rackId));
        currentTransaction.setProduct(product);
    }

    // Processes and completes the current transaction
    Transaction confirmTransaction() throws InvalidTransactionException {
        // Step 1: Validate the transaction before processing
        validateTransaction();

        // Step 2: Charge the customer for the product
        paymentProcessor.charge(currentTransaction.getProduct().getUnitPrice());

        // Step 3: Dispense the product from the rack
        inventoryManager.dispenseProductFromRack(currentTransaction.getRack());

        // Step 4: Return the change to the customer
        currentTransaction.setTotalAmount(paymentProcessor.returnChange());

        // Step 5: Add the completed transaction to the history
        transactionHistory.add(currentTransaction);
        Transaction completedTransaction = currentTransaction;

        // Reset the current transaction for the next purchase.
        currentTransaction = new Transaction();
        return completedTransaction;
    }

    // Validates the current transaction for product availability and sufficient funds
    private void validateTransaction() throws InvalidTransactionException {
        if (currentTransaction.getProduct() == null) {
            throw new InvalidTransactionException("Invalid product selection");
        } else if (currentTransaction.getRack().getProductCount() == 0) {
            throw new InvalidTransactionException("Insufficient inventory for product.");
        } else if (paymentProcessor
                        .getCurrentBalance()
                        .compareTo(currentTransaction.getProduct().getUnitPrice())
                < 0) {
            throw new InvalidTransactionException("Insufficient fund");
        }
    }

    // Returns an unmodifiable list of all completed transactions
    public List<Transaction> getTransactionHistory() {
        return Collections.unmodifiableList(transactionHistory);
    }

    // Cancels the current transaction and returns any inserted money
    public void cancelTransaction() {
        paymentProcessor.returnChange();
        currentTransaction =
                new Transaction(); // Reset the current transaction for the next purchase.
    }

    // Returns the inventory manager instance
    public InventoryManager getInventoryManager() {
        return inventoryManager;
    }
}
Let’s walk through the purchase process and highlight the methods' roles.
PaymentProcessor class.A runnable vending machine built as a State machine: it refuses selections before payment, reports how much more money is needed, flags sold-out slots, and dispenses with change.
from abc import ABC, abstractmethod


def money(cents):
    return "$%.2f" % (cents / 100.0)


class Product:
    def __init__(self, name, price, quantity):
        self.name = name
        self.price = price          # price in cents
        self.quantity = quantity


# ---------- State pattern: each state allows only certain actions ----------
class State(ABC):
    @abstractmethod
    def insert_money(self, machine, amount): ...
    @abstractmethod
    def select_product(self, machine, code): ...


class IdleState(State):
    def insert_money(self, machine, amount):
        machine.balance += amount
        machine.set_state(machine.has_money_state)
        return "Balance: " + money(machine.balance)

    def select_product(self, machine, code):
        return "Please insert money first"


class HasMoneyState(State):
    def insert_money(self, machine, amount):
        machine.balance += amount
        return "Balance: " + money(machine.balance)

    def select_product(self, machine, code):
        product = machine.inventory.get(code)
        if product is None or product.quantity == 0:
            return code + " is sold out"
        if machine.balance < product.price:
            return "Need " + money(product.price - machine.balance) + " more"
        product.quantity -= 1
        change = machine.balance - product.price
        machine.balance = 0
        machine.set_state(machine.idle_state)
        return "Dispensed " + product.name + ", change " + money(change)


class VendingMachine:
    def __init__(self, inventory):
        self.inventory = inventory
        self.balance = 0
        self.idle_state = IdleState()
        self.has_money_state = HasMoneyState()
        self.state = self.idle_state

    def set_state(self, state):
        self.state = state

    def insert_money(self, amount):
        return self.state.insert_money(self, amount)

    def select_product(self, code):
        return self.state.select_product(self, code)


def main():
    inventory = {
        "A1": Product("Coke", 150, 1),
        "A2": Product("Water", 100, 0),   # already sold out
    }
    vm = VendingMachine(inventory)

    print("select A1  -> " + vm.select_product("A1"))
    print("insert $1  -> " + vm.insert_money(100))
    print("select A1  -> " + vm.select_product("A1"))
    print("insert $1  -> " + vm.insert_money(100))
    print("select A2  -> " + vm.select_product("A2"))
    print("select A1  -> " + vm.select_product("A1"))


if __name__ == "__main__":
    main()
#include <iostream>
#include <string>
#include <map>
#include <cstdio>
static std::string money(int cents) {
char buffer[16];
std::snprintf(buffer, sizeof(buffer), "$%.2f", cents / 100.0);
return std::string(buffer);
}
struct Product {
std::string name;
int price; // price in cents
int quantity;
Product() : name(""), price(0), quantity(0) {}
Product(std::string name, int price, int quantity)
: name(name), price(price), quantity(quantity) {}
};
class VendingMachine; // forward declaration
// ---------- State pattern: each state allows only certain actions ----------
class State {
public:
virtual std::string insertMoney(VendingMachine* machine, int amount) = 0;
virtual std::string selectProduct(VendingMachine* machine, const std::string& code) = 0;
virtual ~State() {}
};
class VendingMachine {
public:
std::map<std::string, Product> inventory;
int balance;
State* idleState;
State* hasMoneyState;
State* state;
VendingMachine(std::map<std::string, Product> inventory, State* idle, State* hasMoney)
: inventory(inventory), balance(0), idleState(idle), hasMoneyState(hasMoney), state(idle) {}
void setState(State* s) { state = s; }
std::string insertMoney(int amount) { return state->insertMoney(this, amount); }
std::string selectProduct(const std::string& code) { return state->selectProduct(this, code); }
};
class IdleState : public State {
public:
std::string insertMoney(VendingMachine* machine, int amount) override {
machine->balance += amount;
machine->setState(machine->hasMoneyState);
return "Balance: " + money(machine->balance);
}
std::string selectProduct(VendingMachine*, const std::string&) override {
return "Please insert money first";
}
};
class HasMoneyState : public State {
public:
std::string insertMoney(VendingMachine* machine, int amount) override {
machine->balance += amount;
return "Balance: " + money(machine->balance);
}
std::string selectProduct(VendingMachine* machine, const std::string& code) override {
std::map<std::string, Product>::iterator it = machine->inventory.find(code);
if (it == machine->inventory.end() || it->second.quantity == 0) return code + " is sold out";
Product& product = it->second;
if (machine->balance < product.price)
return "Need " + money(product.price - machine->balance) + " more";
product.quantity -= 1;
int change = machine->balance - product.price;
machine->balance = 0;
machine->setState(machine->idleState);
return "Dispensed " + product.name + ", change " + money(change);
}
};
int main() {
std::map<std::string, Product> inventory;
inventory["A1"] = Product("Coke", 150, 1);
inventory["A2"] = Product("Water", 100, 0); // already sold out
IdleState idle;
HasMoneyState hasMoney;
VendingMachine vm(inventory, &idle, &hasMoney);
std::cout << "select A1 -> " << vm.selectProduct("A1") << "\n";
std::cout << "insert $1 -> " << vm.insertMoney(100) << "\n";
std::cout << "select A1 -> " << vm.selectProduct("A1") << "\n";
std::cout << "insert $1 -> " << vm.insertMoney(100) << "\n";
std::cout << "select A2 -> " << vm.selectProduct("A2") << "\n";
std::cout << "select A1 -> " << vm.selectProduct("A1") << "\n";
return 0;
}import java.util.LinkedHashMap;
import java.util.Map;
class Product {
final String name;
final int price; // price in cents
int quantity;
Product(String name, int price, int quantity) {
this.name = name; this.price = price; this.quantity = quantity;
}
}
// ---------- State pattern: each state allows only certain actions ----------
interface State {
String insertMoney(VendingMachine machine, int amount);
String selectProduct(VendingMachine machine, String code);
}
class IdleState implements State {
public String insertMoney(VendingMachine machine, int amount) {
machine.balance += amount;
machine.setState(machine.hasMoneyState);
return "Balance: " + VendingMachine.money(machine.balance);
}
public String selectProduct(VendingMachine machine, String code) {
return "Please insert money first";
}
}
class HasMoneyState implements State {
public String insertMoney(VendingMachine machine, int amount) {
machine.balance += amount;
return "Balance: " + VendingMachine.money(machine.balance);
}
public String selectProduct(VendingMachine machine, String code) {
Product product = machine.inventory.get(code);
if (product == null || product.quantity == 0) return code + " is sold out";
if (machine.balance < product.price)
return "Need " + VendingMachine.money(product.price - machine.balance) + " more";
product.quantity -= 1;
int change = machine.balance - product.price;
machine.balance = 0;
machine.setState(machine.idleState);
return "Dispensed " + product.name + ", change " + VendingMachine.money(change);
}
}
class VendingMachine {
final Map<String, Product> inventory;
int balance = 0;
final State idleState = new IdleState();
final State hasMoneyState = new HasMoneyState();
State state = idleState;
VendingMachine(Map<String, Product> inventory) { this.inventory = inventory; }
static String money(int cents) { return String.format("$%.2f", cents / 100.0); }
void setState(State state) { this.state = state; }
String insertMoney(int amount) { return state.insertMoney(this, amount); }
String selectProduct(String code) { return state.selectProduct(this, code); }
}
public class Main {
public static void main(String[] args) {
Map<String, Product> inventory = new LinkedHashMap<>();
inventory.put("A1", new Product("Coke", 150, 1));
inventory.put("A2", new Product("Water", 100, 0)); // already sold out
VendingMachine vm = new VendingMachine(inventory);
System.out.println("select A1 -> " + vm.selectProduct("A1"));
System.out.println("insert $1 -> " + vm.insertMoney(100));
System.out.println("select A1 -> " + vm.selectProduct("A1"));
System.out.println("insert $1 -> " + vm.insertMoney(100));
System.out.println("select A2 -> " + vm.selectProduct("A2"));
System.out.println("select A1 -> " + vm.selectProduct("A1"));
}
}Sample run — identical across all three languages:
select A1  -> Please insert money first
insert $1  -> Balance: $1.00
select A1  -> Need $0.50 more
insert $1  -> Balance: $2.00
select A2  -> A2 is sold out
select A1 -> Dispensed Coke, change $0.50Now that the basic design is complete, the interviewer might ask you to enhance the vending machine’s functionality or accommodate more complex use cases.
What if the interviewer asks: “How would you ensure that users insert money before selecting a product?” This is a common requirement in vending machines to prevent invalid actions, such as selecting a product without committing to payment.
To address this, we need to enforce a strict sequence of actions:
Additionally, the vending machine should provide feedback at each stage to guide the user. For instance, it might display messages like “Insert money to proceed,” “Select a product,” or “Please collect your change.” How would you go about implementing this?
To handle these requirements, we can introduce the State Pattern. This pattern allows us to model the vending machine’s behavior as a set of well-defined states. Let’s break it down.
Note: To learn more about the State Pattern and its common use cases, refer to the Further Reading section at the end of this chapter.
To enforce task sequences and display state-dependent messages, we will define three distinct states:
NoMoneyInsertedState:
MoneyInsertedState:
DispenseState:
Why does this work?
The State Pattern explicitly defines the transitions between states, ensuring that actions follow the required order. Here’s how it works:
This approach guarantees the sequence: Insert Money → Select Product → Dispense Product.
Each state provides user feedback based on its context:
We now define a VendingMachineState interface that serves as a blueprint for the three states (NoMoneyInsertedState, MoneyInsertedState, and DispenseState).
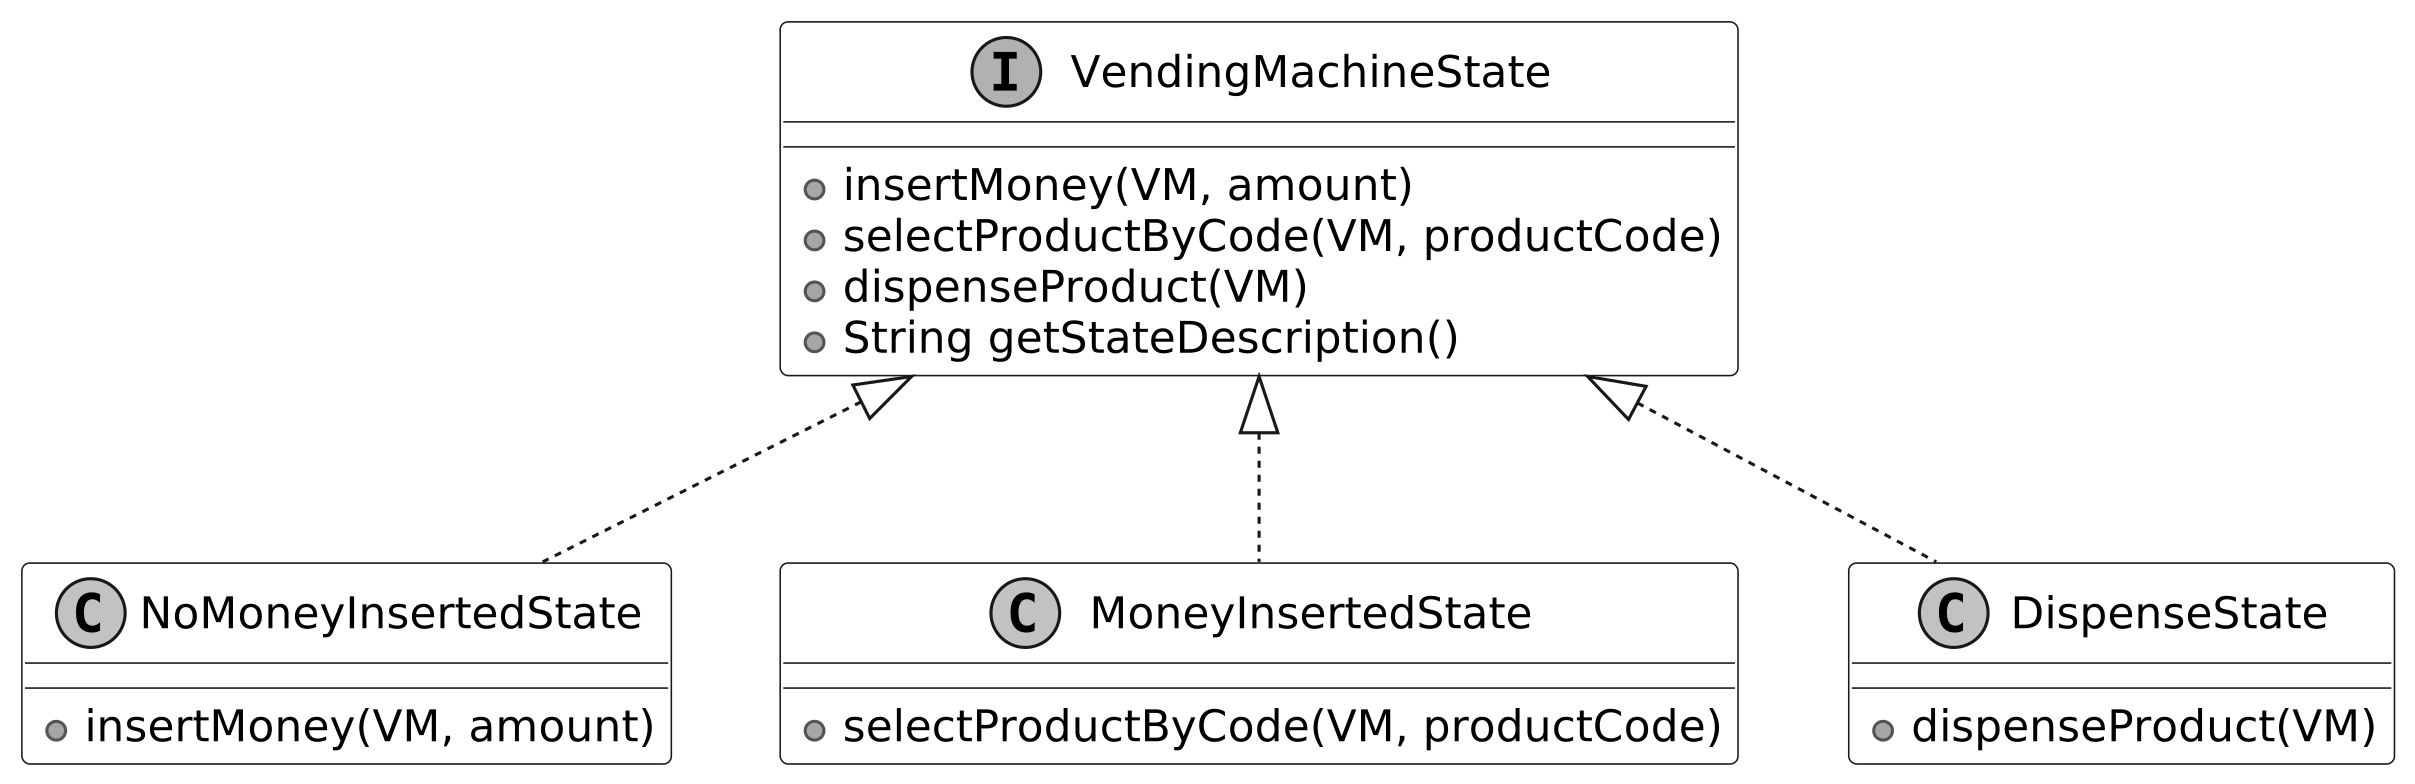
The VendingMachineState interface sets the rules for all states of the vending machine. It includes the behaviors that different states of the vending machine should implement, such as inserting money, selecting products, dispensing products, and describing the current state.
public interface VendingMachineState {
    // Handles money insertion in the current state
    void insertMoney(VendingMachine VM, double amount);

    // Handles product selection in the current state
    void selectProductByCode(VendingMachine VM, String productCode)
            throws InvalidStateException;

    // Handles product dispensing in the current state
    void dispenseProduct(VendingMachine VM) throws InvalidStateException;

    // Returns a description of the current state
    String getStateDescription();
}
Here is the code for the NoMoneyInsertedState class:
public class NoMoneyInsertedState implements VendingMachineState {
    // Adds money to the machine and transitions to MoneyInsertedState
    @Override
    public void insertMoney(VendingMachine VM, double amount) {
        VM.addBalance(amount);
        VM.setState(new MoneyInsertedState());
    }

    // Throws exception as product selection is not allowed without money
    @Override
    public void selectProductByCode(VendingMachine VM, String productCode)
            throws InvalidStateException {
        throw new InvalidStateException("Cannot select a product without inserting money.");
    }

    // Throws exception as product dispensing is not allowed without money
    @Override
    public void dispenseProduct(VendingMachine VM) throws InvalidStateException {
        throw new InvalidStateException("Cannot dispense product without inserting money.");
    }

    // Returns a description of the current state
    @Override
    public String getStateDescription() {
        return "No Money Inserted State - Please insert money to proceed";
    }
}
For brevity, the implementation of the MoneyInsertedState and DispenseState classes is omitted, but they follow the same structure.
In this chapter, we have designed and implemented a Vending Machine system. The most important takeaway from this chapter is how we divided responsibilities across classes, such as Product, Rack, InventoryManager, and PaymentProcessor, while unifying them under a facade for a clear and simple-to-access API. This approach not only simplified the system’s external interface but also adhered to the Single Responsibility Principle, ensuring each component focused on a specific responsibility. For instance, the InventoryManager managed stock levels, while the PaymentProcessor handled cash payments and calculated change.
In the deep dive section, we explored state-based control using the State Pattern to enforce a strict sequence of actions and prevent invalid behaviors like dispensing without payment.
In interviews, remember to emphasize validation and error handling after implementing core functionality, especially for systems where improper behavior could cause damage or financial loss.
Congratulations on getting this far! Now give yourself a pat on the back. Good job!
This section gives a quick overview of the design patterns used in this chapter. It’s helpful if you’re new to these patterns or need a refresher to better understand the design choices.
The State pattern is a behavioral pattern that allows an object to alter its behavior when its internal state changes, making it appear as though the object is behaving like a different class.
In the vending machine design, we use the State pattern to manage states like NoMoneyInsertedState, MoneyInsertedState, and DispenseState, enabling the VendingMachine to switch behaviors dynamically without modifying its core logic.
To illustrate the State pattern in another domain, the following example uses the traffic light system.
Problem
Imagine we have a TrafficLight class. The traffic light can be in one of three states: Red, Yellow, or Green. The behavior of the traffic light changes depending on its current state:
If we were to implement this logic using conditionals, we would need to check the current state of the traffic light every time an action occurs.
While the solution works initially, several issues arise as the system becomes more complex:
Scalability: As the number of states increases, the conditionals grow larger. For example, adding a new state (like a flashing state for emergency vehicles) would require adding more checks to the existing logic, making the code increasingly hard to manage and prone to errors.
Maintainability: The duplication of code and the need to update the same conditional logic in multiple places make the system difficult to maintain over time. This is a crucial problem because it impacts long-term code quality and increases the chance of introducing bugs when modifying the logic.
Solution
Instead of relying on conditionals to manage state transitions, we can use the State pattern, which encapsulates the behavior associated with each state into separate classes.
Rather than handling all behaviors on its own, the original object, known as the context, holds a reference to one of the state objects that represents its current state, delegating the state-related tasks to that object.
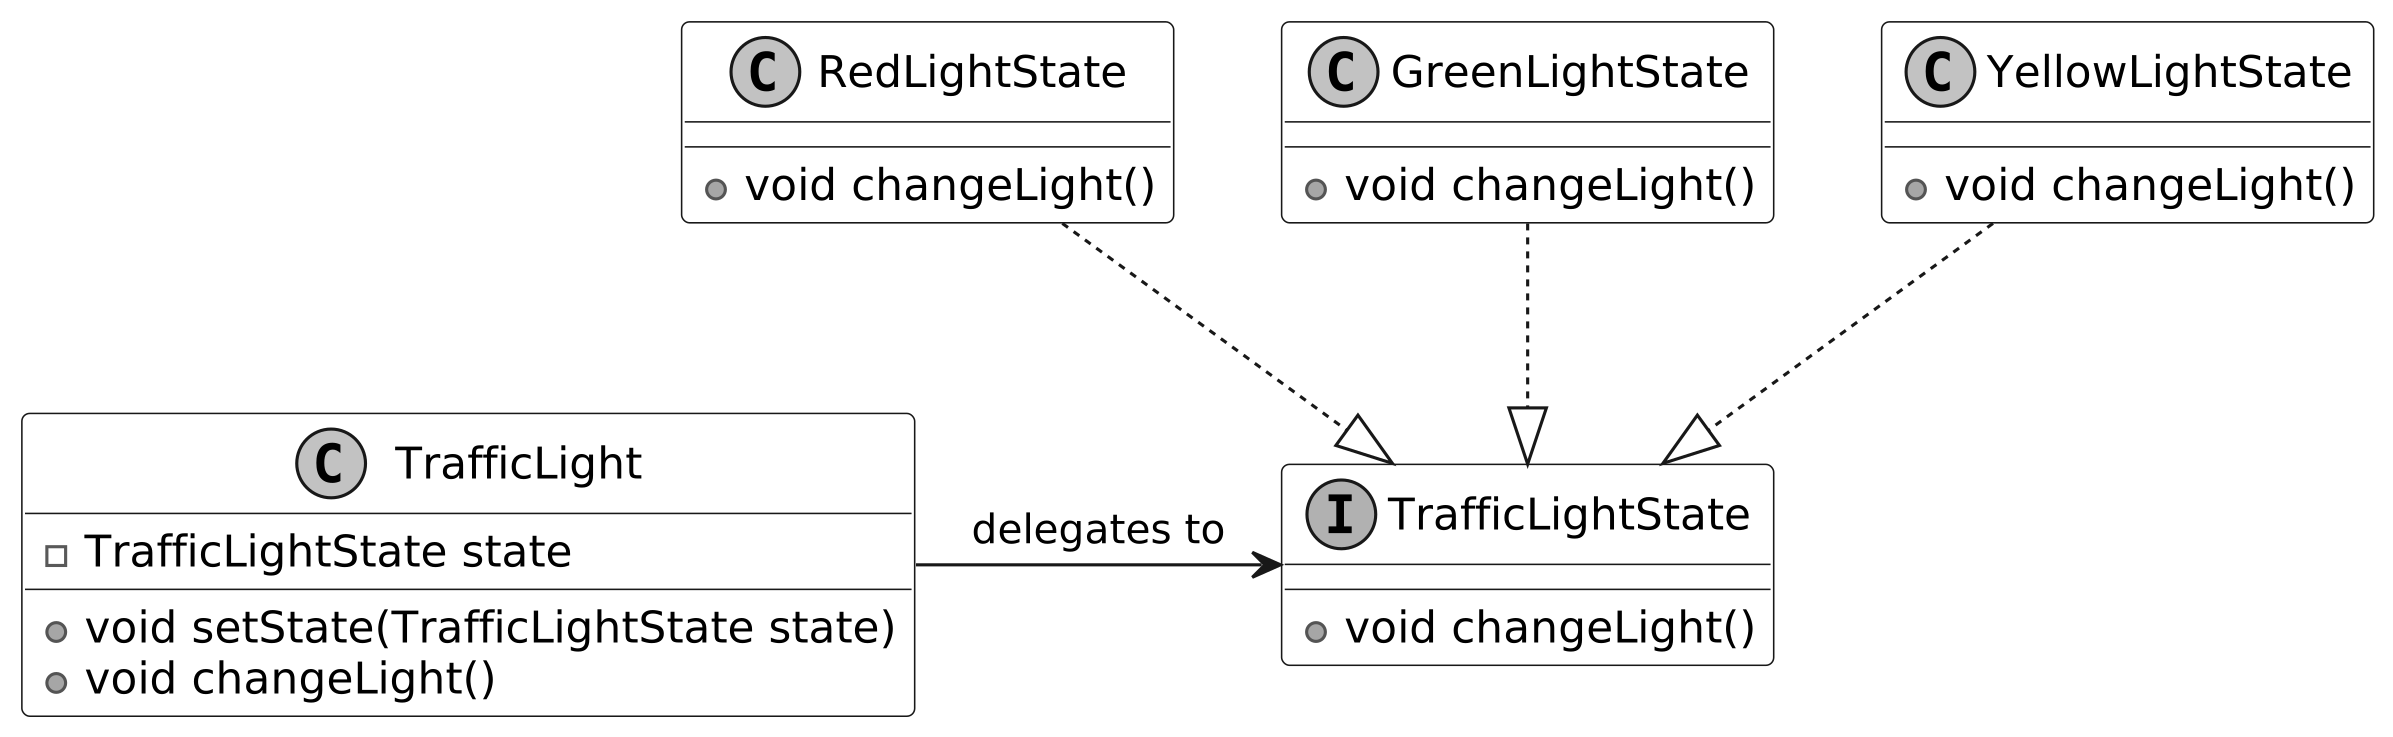
For example, a TrafficLight context can delegate its behavior to a state object, like RedLightState, GreenLightState, or YellowLightState. Each of these states knows how to handle the actions specific to that state, such as changing the light or transitioning to the next state.
To transition to a new state, the context simply replaces the current state object with another one that represents the new state. For instance, when the light is Green, the system transitions to Yellow, and then to Red, without needing complex conditionals.
Here is the representation of the state pattern.